The Heart of Fear is the second raid of Tier 14 in MoP Classic and marks a sharp escalation in mechanical difficulty after Mogu’shan Vaults. This Mantid stronghold shifts the focus away from forgiving positioning checks and toward strict personal responsibility, execution, and coordination. Mistakes that were survivable earlier in the tier are lethal here, especially on Heroic difficulty.
This guide breaks down everything you need to progress through Heart of Fear efficiently in the current MoP Classic environment.
In this guide, you’ll learn:
- Entry requirements, lockout rules, and raid preparation for MoP Classic (2026)
- The optimal Heroic progression kill order and why it works
- Boss-by-boss mechanics with emphasis on common wipe points
- How Heroic mode changes each encounter compared to Normal
- Key execution checks for fights like Garalon, Amber-Shaper Un’sok, and Shek’zeer
- Tier 14 loot, token distribution, and achievement relevance
- How Heart of Fear prepares your raid for Terrace of Endless Spring and the Throne of Thunder

Entry Requirements, Lockouts & Raid Prep (MoP Classic 2026)

Before you set foot in the Townlong Steppes or the Dread Wastes, you must understand the logistical landscape of Pandaria raids in 2026.
- Access & Location: The raid entrance is located at the base of the Great Tree, Kypar’vess, in the western Dread Wastes. Unlike the early days of the original expansion, there is no formal quest attunement required for entry. To get there quickly, use faction portals from Orgrimmar or Stormwind to reach the Vale of Eternal Blossoms, then fly west. Your flight path takes you from the lush Jade Forest through the heart of the continent.
- LFR Status: Consistent with the design pillars of MoP Classic, Raid Finder (LFR) is not available. Heart of Fear must be completed in organized 10- or 25-player groups. This encourages both the Horde and Alliance factions to maintain active social rosters.
- Heroic Lockout Warning: Normal and Heroic difficulty use separate lockouts. However, after your first Heroic boss kill, expect your Heroic lockout to behave like a fixed ID for the week. Avoid joining late-boss Heroic groups unless you are comfortable losing access to earlier bosses.
- Mythic Difficulty: Note that Mythic difficulty does not exist in this era; Heroic remains the pinnacle of challenge for the three raids comprising Tier 14.
- Consumables & Prep: Progression requires standard MoP flasks and food buffs. Given the high physical damage from fights like Garalon and Ta’yak, armor potions and external damage-reduction cooldowns should be mapped out in your raid notes before the first pull.
Optimal Heart of Fear Progression & Heroic Kill Order

In MoP Classic, the difficulty of the encounters does not follow a linear path. The most common progression kill order is:
| Order | Boss | Why This Order Works |
| 1 | Blade Lord Ta’yak | Lowest coordination burden, clean Heroic mechanics |
| 2 | Garalon | Predictable damage pattern, manageable DPS check |
| 3 | Wind Lord Mel’jarak | Heroic CC simplifies add management |
| 4 | Imperial Vizier Zor’lok | High personal responsibility & movement checks |
| 5 | Amber-Shaper Un’sok | Complex execution, Construct mastery required |
| 6 | Grand Empress Shek’zeer | Long fight, Phase 2 execution gate |
Heart of Fear Boss Guide – Mechanics & Heroic Strategy
I. Imperial Vizier Zor’lok
Zor’lok acts as the hive’s mechanical filter. The encounter rotates between three platforms: Attenuation (dodging discs), Force and Verve (stacking), and Convert (Mind Control).
- Randomized Platforms: The order of platforms is random each pull, requiring quick adaptation.
- Heroic vs Normal: Heroic adds additional Echo pressure. Positioning discipline on the map is vital to ensure healers remain in range during the high-damage Force and Verve pulses. Mastery here is required before you can face the thunder of future tiers.

II. Blade Lord Ta’yak
Ta’yak blinks to random players and applies a heavy physical bleed called Wind Step.
- Soft Enrage: This fight has a soft enrage via Intensify stacks, which increase Ta’yak’s damage and haste as the fight wears on.
- Mitigation: Handle the Wind Step DoT using Hand of Purity (Paladin) or Diffuse Magic (Monk). At 10%, the gauntlet phase begins; warriors are invaluable here for mobility, while Priest Life Grips can pull lagging members through the tornadoes. This is widely considered the first Heroic mode kill for most guilds.


III. Garalon
Garalon ignores traditional aggro and follows the player with the Pheromones debuff.
- Hard DPS Check: This is a classic timer and execution boss. Poor Pungency management bleeds time and healing until the kill becomes impossible.
- Heroic Predictability: On Heroic, Crush occurs on a strict, 30-second cadence. This allows healers to pre-cast major throughput cooldowns with clinical precision. Break the legs to slow him down and deal massive damage to the main body.
IV. Wind Lord Mel’jarak
Your raid leads the fight by managing four groups of adds: Menders, Blademasters, Amber Trappers, and Commanders.
- The CC Strategy: On Heroic, you can crowd-control the Amber Trappers indefinitely. Killing a set of three adds triggers Recklessness (a 100% damage-taken debuff on the boss). Do not waste major DPS cooldowns until this buff is active.

V. Amber-Shaper Un’sok
This fight revolves around the Mutated Construct transformation and requires extreme personal responsibility.
- The Designated Driver: Using a durable player as a “driver” centralizes Willpower management. They must use Struggle for Control to interrupt the boss’s Amber Explosion; failure to do so is an immediate raid wipe.
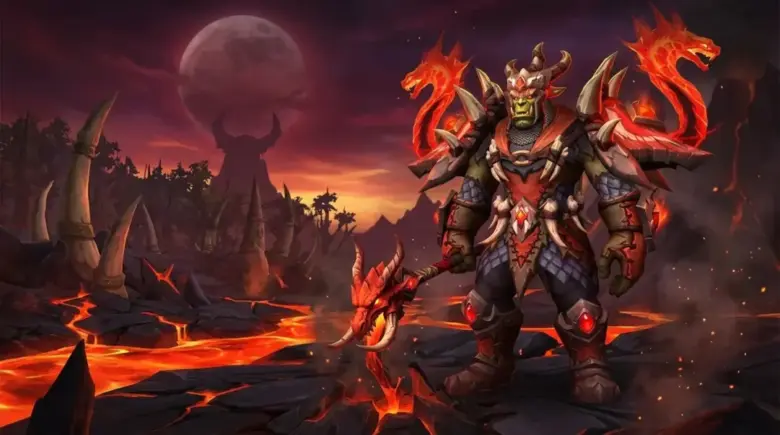
VI. Grand Empress Shek’zeer (The Last Boss)
The last boss is a three-phase finale. Mastery of Phase 2—building Amber Traps to remove adds—is the primary gate.
- Execution Dependency: Phase 2 mistakes make Phase 3 unhealable even if time remains. Avoid the Consuming Terror fear cone and stack for Dissonance Fields. If you previously defeated the Emperor (Will of the Emperor) in Mogu’shan Vaults, you are prepared for this final check.


Heart of Fear Loot Table, Tier 14 Tokens & Achievements

Heart of Fear provides Tier 14 Chest, Leg, and Glove tokens, which are essential for continued Tier 14 progression, including the Lei Shi encounter in Terrace of Endless Spring.
| Boss | Notable Drop | Slot / Type |
| Wind Lord Mel’jarak | Shadowy Tokens | Tier 14 Gloves |
| Amber-Shaper Un’sok | Shadowy Tokens | Tier 14 Legs |
| Grand Empress Shek’zeer | Shadowy Tokens | Tier 14 Chest |
| Grand Empress Shek’zeer | Claws of Shek’zeer | Agility Fist Weapon |
Beyond gear, clearing MSV, HoF, and ToES contributes to the “Glory of the Pandaria Raider” meta-achievement, which rewards a unique mount. Note that while a Celestial Dragon is a well-known pet in this expansion, it is a reward for pet collecting, not raid achievements. No mounts drop directly from the bosses in Heart of Fear. For players visiting the Mogu’shan Palace dungeon or flying over the Kun-Lai Summit, remember that those locations serve separate leveling or valor purposes. It remains the definitive Mantid stronghold of Tier 14.
What’s Next After Heart of Fear? Throne of Thunder Prep

Once the Mantid hive falls, the thunder of a new threat begins to echo from the north. Your success here prepares you for the storm-wracked Island of Thunder, where you will eventually face Lei Shen on his hostile Isle.
Before storming the Island of Thunder, you must first silence the Empress. The lessons in mechanical precision learned here are mandatory for the upcoming battle against the Thunder King himself. Clearing the Hive prepares your raid mechanically and thematically for the next chapter of Tier 14 and the expansion’s ongoing narrative centered on the Vale of Eternal Blossoms.
Final Verdict: The Heart of Fear is a masterpiece of design that rewards discipline. Master the Construct, kite the giant bug, and claim your rewards. Good luck in the hive.
Epiccarry: best wow boost and coaching services
Frequently Asked Questions
How do I get into the Heart of Fear raid in MoP Classic?
To unlock the Heart of Fear raid in MoP Classic, you need to complete a specific attunement chain. This chain starts with The Direct Route quest, given by Lorewalker Ruolan for the Horde or Lorewalker Shuchun for the Alliance, located in the Vale of Eternal Blossoms, east of the Jade Forest. This questline will guide you on a journey that eventually leads you to the Gate of the Setting Sun dungeon. Clearing this dungeon on Heroic difficulty is the crucial final step and the key requirement for gaining access to the Heart of Fear raid.
Where is the Heart of Fear raid entrance located?
The entrance to the Heart of Fear raid is specifically located in the base of a large rotting tree structure found in the western part of the Dread Wastes. This zone is situated near the border with Townlong Steppes on the map of Pandaria.
What raid sizes and difficulties are available for Heart of Fear?
For players braving the Heart of Fear in World of Warcraft: Mists of Pandaria Classic, the raid is available in both 10-man and 25-man sizes. Each of these sizes can be tackled on either Normal or Heroic difficulties.
Is there a Raid Finder (LFR) version of Heart of Fear in MoP Classic?
No, in MoP Classic, there is no Raid Finder (LFR) version for the Heart of Fear. Unlike the modern world of Retail WoW, content in this classic progression is designed to be tackled in organized Normal or Heroic groups of either 10 or 25 players.
How hard is the Heart of Fear raid compared to Mogu’shan Vaults?
The Heart of Fear is described as a considerable step up compared to Mogu’shan Vaults. Mogu’shan Vaults is generally considered the entry-level raid for Tier 14, while Heart of Fear represents the mid-tier challenge in the classic progression raid path.
What are the bosses in the Heart of Fear raid?
As you venture into the Heart of Fear, you will encounter six distinct bosses. In order, they are Imperial Vizier Zor’lok, Blade Lord Ta’yak, Garalon, Wind Lord Mel’jarak, Amber-Shaper Un’sok, and the final boss, Grand Empress Shek’zeer.
What are the key mechanics for the first boss, Imperial Vizier Zor’lok?
The primary challenge and main party trick of Imperial Vizier Zor’lok is Attenuation. This involves the boss emitting damaging rings from different platforms (Force and Might, Cunning and Deceit, Haste and Intensity). Players must be prepared to actively weave through barrages of discs and orbs – some fast, some slow, and some particularly nasty green ones. As the fight progresses, Echoes of previous platforms appear, continuing their Attenuation patterns. Testing notes also mentioned potential bugs with random lethal green orbs and tanks potentially losing aggro if the boss and Echo were too far apart, forcing tighter positioning and making dodging even more intense. Expect to need quick feet and sharp eyes to manage this.
What makes Blade Lord Ta’yak considered the easiest boss?
Blade Lord Ta’yak is generally considered the easiest boss in the Heart of Fear raid. He is described as a simple fight with an unusual and innovative final phase that tests movement and DPS. His signature move, Wind Step, usually applies a heavy damage-over-time debuff (a powerful bleed) that requires management. However, if this crucial dot is inactive (as observed in some testing), it makes the boss significantly easier than intended, turning him into a loot piñata. Even with the dot functioning correctly on live servers, managing that single mechanic is expected to be the main task, and he should still be the most accessible Heroic kill.
How is the Garalon fight different on Heroic difficulty compared to Normal?
The Garalon fight offers an exciting, unique encounter testing precise tactics. Interestingly, he might be easier on Heroic mode than Normal thanks to a key mechanic change! On Normal, his powerful Crush ability hits the raid unpredictably whenever a debuff (Pheromones) is passed between players, which can overwhelm healers if mishandled. On Heroic, Crush is on a strict, predictable timer, making it much easier for healers to anticipate and prepare for the incoming damage. This predictability of Crush on Heroic is a significant advantage compared to Normal.
What is the main challenge when fighting Wind Lord Mel’jarak, especially on Heroic?
Wind Lord Mel’jarak is described as a complex encounter with many add types. On Heroic mode, the key to making the fight easier is that you can crowd-control the annoying Amber Trapper adds out of the fight entirely, bypassing their mechanics. The focus then shifts to managing waves of Battle-Menders (which must be interrupted), Blade Masters (requiring personal defenses for their charges), and Commanders. The core loop involves strategically killing adds to trigger the massive 600% boss damage amplification buff (Recklessness), then bursting the boss during this window.
Why is Amber-Shaper Un’sok considered the most complex fight and a test of personal responsibility?
Amber-Shaper Un’sok is described as immensely complex and original, heavily testing individual player execution. This is particularly true when players are transformed by Reshape Life into a Mutated Construct. Each player turned into a Construct must quickly learn to interrupt the Amber Monstrosity (specifically its Amber Explosion cast via the Struggle for Control ability) and use a debuffing attack (Amber Strike to stack boss debuffs) within tight windows and while managing their Willpower. This process is noted as being tough for everyone to master, leading to many wipes if multiple players struggle.
What is a noted strategy for the Amber Construct mechanic on Un’sok?
A noted strategy to manage the Amber Construct mechanic on Un’sok involves designating one player (a durable spec like a tank, perhaps a Monk Class Brewmaster, is recommended) to remain the Construct throughout the fight. This dedicated player focuses solely on applying and maintaining damage stacks on both the boss and the Amber Monstrosity. Any other players who get transformed are immediately broken out of the Construct form by the raid. This dramatically reduces the burden and personal responsibility on the rest of the raid members, making the dangerous final phase much more manageable.
What are the key mechanics for the last boss, Grand Empress Shek’zeer?
Grand Empress Shek’zeer is the last boss of the Heart of Fear and is described as a three-phase fight with lots of adds and an intense final phase, making her the hardest boss. Key mechanics include managing Eyes of the Empress in Phase 1 (a taunt/soak mechanic), surviving lethal targeted abilities in Phase 2 (like the Consuming Terror cone, Cavitation debuff, and Adrenaline buff), mastering the lengthy and dangerous Phase 2 which involves building traps and kiting adds, and handling new mechanics like Windstorm and Dissonance Fields in Phase 3.
Do I need to clear Mogu’shan Vaults before entering Heart of Fear?
No, clearing Mogu’shan Vaults is not a direct requirement to enter the Heart of Fear raid. The specific attunement requirement for Heart of Fear is completing the quest chain that leads to and includes clearing the Gate of the Setting Sun dungeon on Heroic mode.
Do I need to clear Heart of Fear before entering The Terrace of Endless Spring?
Yes, clearing Heart of Fear is a requirement for the next raid tier. Conquering the Heart of Fear on Normal difficulty is specifically required before you can even queue up for The Terrace of Endless Spring, which is the final raid in the classic progression of Tier 14.
What kind of gear and rewards can I get from the Heart of Fear raid?
The Heart of Fear raid drops awesome Tier 14 raid gear, which is essential for powering up your character. Defeating the bosses offers significant rewards, including raid gear pieces, specific Tier 14 armor tokens (Legs from Zor’lok, Gloves from Mel’jarak, Chest from Shek’zeer), achievements for completing the raid and its challenges, and potentially mounts. Loot generally has item levels of 496 on Normal difficulty and 509 on Heroic difficulty.
How important is personal responsibility in Heart of Fear, especially on Heroic?
Personal responsibility is highly emphasized in Heart of Fear, particularly on Heroic difficulty. Getting hit by mechanics individually is much less forgiving and can quickly lead to deaths, especially in larger raid groups. Some bosses, like Amber-Shaper Un’sok and Imperial Vizier Zor’lok, specifically test individual player execution and dodging abilities. Navigating this emphasis on individual performance is a key aspect of the raid’s challenge.
What class abilities or talent types are particularly useful in Heart of Fear?
MoP Classic’s talent system provides various tools useful in Heart of Fear. Movement talents are invaluable for dodging and repositioning quickly. Defensive & Survival abilities, including external cooldowns, are crucial for mitigating damage spikes on tanks and raid members, and self-heals aid personal survival. Crowd Control talents are fantastic for managing add waves, especially CC-ing the Amber Trappers on Mel’jarak Heroic. Finally, optimizing Damage Profiles for either single-target or AoE (like a melee DPS specializing for certain boss phases) is necessary depending on the specific boss encounter’s demands.
Were there any significant bugs observed during testing that might affect the raid?
Yes, testing notes mentioned some potential bugs that could affect the raid experience. These included observing random lethal green orbs and tanks potentially losing aggro on Imperial Vizier Zor’lok if the boss and Echo were too far apart, forcing tighter positioning than intended. Notably, Blade Lord Ta’yak’s crucial Wind Step dot seemed inactive during some testing, making the fight significantly easier than its design.
What is the raid progression path for Tier 14 in MoP Classic?
The clear classic progression raid path for Tier 14 in MoP Classic features three raids. It begins with Mogu’shan Vaults, which is considered the entry-level raid. This is followed by the Heart of Fear, which serves as the mid-tier challenge. The progression culminates with The Terrace of Endless Spring, generally considered the toughest raid of the tier.