
Updated November 1, 2026 for Diablo 4 Necromancer Build.
The Season 15 Army of the Dead Diablo 4 Necromancer build uses Service and Sacrifice Skeleton Warriors to consume corpses, charge Sanguivor, Blade of Zir, and release stored souls with its ultimate. You need at least two pieces of Berú of the Waking Touch to support the cooldown-reset loop.
Leveling before Army of the Dead
Start with the Summoner setup on Hard and keep the difficulty low enough that elites and seasonal enemies die quickly without threatening you. Move up when unlocking the next difficulty becomes easy, and prepare your endgame equipment as you approach level 70.
Corpse Explosion supplies early burst and area damage while your minions provide corpses and absorb attacks; its Season 15 buffs let you delay the Army of the Dead transition until roughly level 40–50, after investing in Skeleton Mage and Skeleton Warrior ranks. Corpse Explosion's comeback feels overdue to some players who missed using it as a build centerpiece.
Book of the Dead milestones
| Level | Change |
| 5 | Take Skirmisher Warriors Upgrade #1 for two additional warriors, and Shadow Mages Upgrade #2 for defenses that scale with Maximum Life. |
| 8 | Take Bone Golem Upgrade #1 for corpse generation on demand. |
| 12 | Change Warriors to Reapers Upgrade #1 for more corpses and cooldown support. |
| 50 | Change Warriors to Reapers Upgrade #2 and take Bone Golem Sacrifice for its Attack Speed benefit. |
The final leveling Reaper upgrade adds 50%[x] damage and a 15% chance to stun for one second. Shadow Mage bolts grant both you and the mage a barrier worth 3% of your Maximum Life for four seconds, stacking to 30%; Bone Golem Sacrifice adds 10%[+] Attack Speed while cutting the golem's damage by 50%[x].
Early combat and curses
- Send your Golem and Skeleton Warriors into the pack with their active abilities.
- Spend available corpses with Corpse Explosion; channel Decompose for more corpses and control while you still use it.
- Apply Iron Maiden once you have invested in it, gaining Ferocity, Overpower, Fortify and healing support through Blood Orbs.
- Use Sever when you need movement or an emergency corpse, and use Army of the Dead when extra damage is needed.
Igni paired with Wat applies Decrepify automatically, while Igni paired with Teb automates Iron Maiden, with the leveling setup describing a 1.2-second interval. Use Wat when you want Decrepify applied automatically without it on your bar; use Teb when you prefer Iron Maiden with Decrepify on your bar for manual Unholy Frenzy control.
Leveling gear and resource spending
Prioritize weapon damage on your two-handed weapon, Maximum Life on defensive armor, Movement Speed on boots and your amulet, and Vulnerable or general damage multipliers on offensive pieces. Minions inherit your stats, including Armor, Resistances, Attack Speed and Critical Strike Chance.
Tempering and Enchanting each cost five Veiled Crystals in the early game, and Worldly Endurance's Maximum Life temper can nearly double early character and minion health. Salvage unused equipment, check town merchants for useful upgrades, and use Mercenary Rapport bartering or Murmuring Obols to pursue particular slots.
Imprinting costs 10 Baleful Fragments, obtained through sources including salvaged Legendary or Unique items and Baleful Chests in PvP areas. Delay frequent imprinting until you are preparing to move beyond Penitent; an amulet is a useful home for an important aspect because its effect receives 150% scaling and the slot needs fewer early replacements.
Avoid paying to add sockets before level 50 because of frequent equipment replacement; existing weapon sockets can hold Amethysts for Shadow damage, while jewelry can hold Soul Splinters or resistance gems. Put early runewords in your helm, chest or pants, and salvage the item to recover its runes without a fee.
Useful early options include The Undercrown for additional skeletons, Pact of Bone for minion critical chance and Attack Speed, and Will of Rathma for a straightforward damage increase. Save Insight's runes for a maximum-level Ancestral base rather than spending them immediately.
For early utility, Nagu + Ceh or Cir + Ceh summons up to six Spirit Wolves that can trigger Lucky Hit effects, while Cir + Kry pulls enemies together with Vortex. Nagu + Que, Igni + Que and Cir + Que offer barrier options in descending effectiveness and uptime.
Choose a Horadric Seal with as many charm slots as possible while leveling, and pursue Practiced Technique's complete set alongside Movement Speed, Minion or Darkness Skill ranks, Shadow damage and Minion Attack Speed. Varyana is the leveling companion recommendation, while rotating your reinforcement helps develop Rapport across companions for loot caches and Pale Marks.
Endgame requirements and skill priorities
The endgame setup assumes a level 70 character with Torment 1 unlocked, with target minimums of 100% Critical Strike Chance and more than 30,000 Maximum Life. Sanguivor, Blade of Zir is a required highest-priority Mythic and The Undercrown is a mid-priority one, while reaching the critical cap can be expensive.
The complete skill budget is 83 points: 69 from leveling and 14 from Season Rank on Seasonal characters or Renown on Eternal characters. Curses unlock at level 13 in the Lord of Hatred skill tree; extra Season Rank or Renown points can raise already-unlocked skills but do not advance cluster unlocks.
For the Sanguivor setup, use Army of the Dead, Skeleton Warrior, Skeleton Mage, Golem, Sever and Corpse Explosion in the combat loop. Blood Moon Breeches handles Decrepify and Iron Maiden, leaving both curses off your skill bar, and additional Golem ranks take the lowest priority after its first rank.
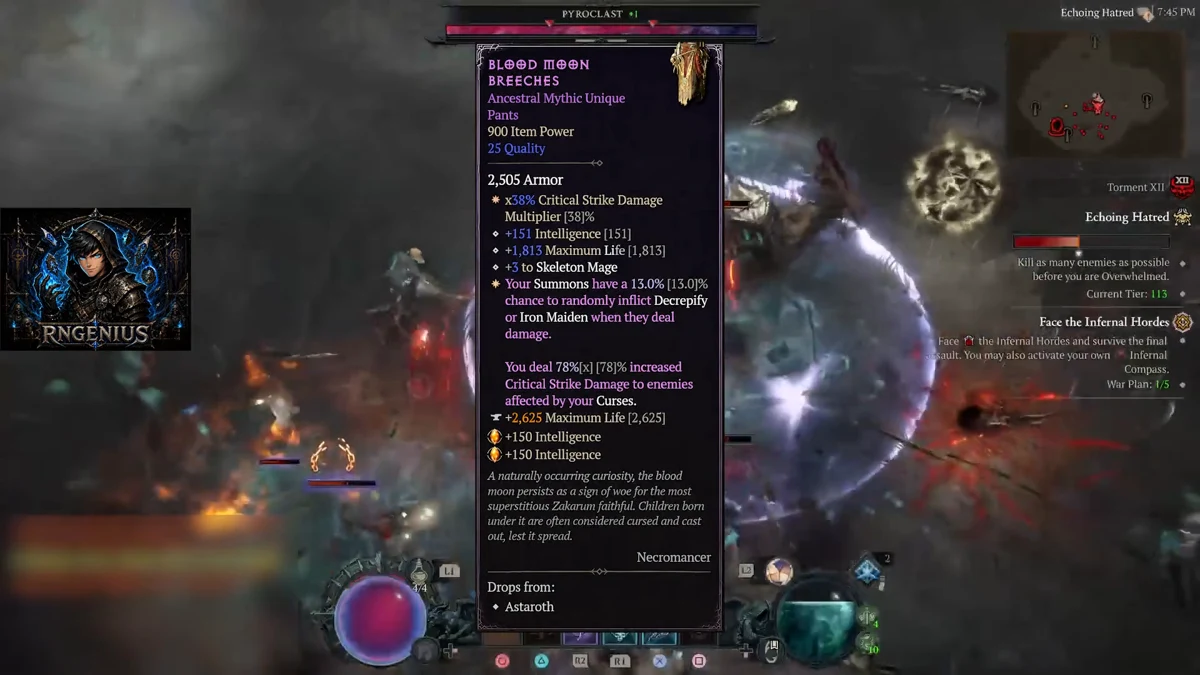
Screenshot: RNGenius on YouTube.
| Minion | Endgame selection |
| Skeleton Warriors | Reapers Upgrade #1 makes the skill Darkness-tagged; wind-up attacks create a corpse and reduce an active cooldown by three seconds. |
| Skeleton Mages | Cold Upgrade #2 adds occasional blizzards lasting six seconds and makes enemies hit by Cold Mages Vulnerable for four seconds. |
| Golem | Iron Sacrifice grants 15%[x] Critical Strike Damage while reducing golem damage by 50%[x]. |

Sanguivor rotation and boss damage
Sanguivor makes your summons apply Vampiric Curse, and each consumed corpse contributes three souls toward a maximum of 20. Army of the Dead releases those souls, increasing both its own damage and soul damage by 20–25%[x] per soul, depending on the weapon's roll.
- Open with Sever to create a corpse.
- Restore missing Skeleton Mages and activate Golem.
- Cast Corpse Explosion on corpses produced by your army until stored souls approach or reach 20; Service and Sacrifice Warriors consume corpses automatically alongside you.
- Cast Army of the Dead to release the stored damage, then rebuild the soul stack for the next activation.
The Multiple Corpses upgrade reduces the number of Corpse Explosion casts needed to prepare your burst. Skip filler casts when automatic consumption already gets you to the soul cap efficiently.
Army of the Dead offers heavy burst against bosses and broad area damage, but its setup demands a deliberate rotation. The damage and critical results felt difficult to reproduce to others, who found the rotation sluggish.
Sanguivor gear and farming priorities
Keep the following equipment choices together for the corpse-and-soul version.
| Slot | Equipment and purpose |
| Helm | The Undercrown adds four to the maximum count of both Warriors and Mages, increases Summon damage, and makes commanded Warriors direct Mage focus for five seconds. |
| Chest | Prioritize Enigma, then Stealth, with Aspect of Hardened Bones as a fallback. |
| Gloves | Crushing Aspect increases damage while you are Fortified. |
| Pants | Blood Moon Breeches automates curses through summon hits; Aspect of Death's Defense is the alternative, adding increased critical damage against cursed enemies. |
| Boots | Aspect of Hewed Flesh supplies Lucky Hit corpse generation and increases Corpse Skill damage. |
| Two-handed weapon | Sanguivor, Blade of Zir powers the stored-soul burst. |
| Amulet | Use Blood-Mad Idol or Hellbent Commander Aspect, with Aspect of Accursed Touch as the Transfigured outcome. |
| First ring | Prioritize Hellbent Commander Aspect, with Cadaverous Aspect as an alternative. |
| Second ring | Vehement Brawler's Aspect adds two Ultimate ranks and increases damage for eight seconds after an Ultimate cast. |
Blood-Mad Idol trades survivability for a large offensive bonus: it keeps Berserking active while imposing Burning damage. Enigma adds skill ranks, Maximum Life, Teleport and movement speed; Stealth supplies Attack Speed and mobility.
Where to get the core items
| Item | Target or recipe |
| Sanguivor, Blade of Zir | Lord Zir offers the highest listed chance. |
| The Undercrown | Target Duriel. |
| Blood Moon Breeches | Target Astaroth. |
| Blood-Mad Idol | Can drop globally from bosses. |
| Enigma | Combine Jah, Ith and Ber with a suitable normal-quality base in the Horadric Cube. |
| Stealth | Use Tal and Eth for its runeword recipe. |
An Ancestral crafting base produces an Ancestral runeword Unique. For Mythic upgrades, prioritize Sanguivor, then The Undercrown, then Blood Moon Breeches; you can equip only one Mythic crafted using Pandemonium Fragments in the Horadric Cube.
Affixes and tempers
Prioritize Critical Strike Chance on gloves, amulets and rings, followed by the relevant critical, Vulnerable and general damage multipliers. Sanguivor's weapon temper supplies Critical Strike Chance, and Transfigured critical chance takes priority over other desired outcomes.
Favor Maximum Life on defensive pieces, with Armor, Intelligence and needed Resistances behind it; use Movement Speed on boots. Choose Maximum Life defensive tempers on chest and pants, a minion-hit Fortify temper on your helm, and Critical Strike Damage offensive tempers once your critical chance is high enough.
Berú talismans, runes and Soul Splinters
After meeting the two-piece entry requirement, pursue all five Berú of the Waking Touch pieces before replacing set pieces with unrelated charms. Aim for a Legendary Horadric Seal with an extra Charm Slot affix to reach six slots, then upgrade your existing charms with better versions.
Prioritize Critical Strike Chance on the seal, followed by useful Critical Strike Damage and Physical damage multipliers; Minion Skill ranks and All Stats are desirable charm affixes.
Additional charms
- The Grandfather: Supplies a large damage multiplier once your critical chance is high.
- Endurant Faith: Spreads incoming damage over time and helps with early Mephisto or Echo of Lilith attempts.
- Will of Rathma: Provides a temporary damage increase without a defensive penalty.
- Blood-Mad Idol: Offers a temporary offensive option at a survivability cost before you obtain a well-rolled equipment version.
Gems and runewords
Use a Royal Skull in the weapon for Physical damage scaling and Royal Topaz in remaining armor gem sockets for Intelligence. Nagu + Que sustains an Earthen Bulwark barrier, while Igni + Gar provides 10% Critical Strike Chance.
Jewelry supports up to three Soul Splinters. Choose their benefits with their penalties in mind.
| Splinter | Role and trade-off |
| Pain | Defensive option that reduces damage taken but costs 30% Movement Speed. |
| The Black Soulstone | Kills grant stacking damage bonuses lasting 15 seconds, with increased damage taken per soul; new souls do not refresh existing stacks. |
| Anguish | Increases Attack Speed and Critical Strike Chance while raising Primary Resource costs by 30%. |
| Sin | Optional Maximum Life increase that reduces maximum Primary Resource by 30%. |
| Hellfire | Avoid in this critical-focused endgame setup because it removes 100% Critical Strike Chance. |
| The Mother | Avoid: after contact with 250 enemies, its effect stuns you for four seconds. |
| Damnation | Avoid: killing an elite pack raises Monster Power by one for 25 seconds. |
| Lies | Optional for speedfarming: increases gold and crafting-material drops by 100% and grants 25% bonus experience, but keeps you Weakened and Vulnerable. |
Seasonal powers and the first Splinter
Complete the seasonal questline and defeat the echoes of Diablo beneath Tristram Cathedral, Baal at Arreat Summit and Mephisto in the Durance of Hate to acquire the Prime Evil Splinters. You can use only one Prime Evil Splinter at once, with a mechanism available to change your choice.
Choose Splinter of Terror first for a Helltide-focused early progression route; these powers modify associated activities as well as triggering Prime Evil area attacks. Season 15 also lets Army of the Dead stack up to five times and changes Berú of the Waking Touch to support the Summoning tag rather than only Army of the Dead.
Paragon and mercenaries
For the Sanguivor setup, begin with Mage in the Starter board, then attach Frailty, Flesh-Eater, Scent of Death and Blood Begets Blood in that order. Take the key Legendary nodes before returning to skipped Resistance clusters on Frailty and Flesh-Eater.
Place Warrior in Frailty, Control in Blood Begets Blood and Essence in Scent of Death for this progression route. Raise each glyph to level 25 for its larger activation radius, then to 51 for its secondary damage multiplier.
Use remaining points for useful rare and magic clusters and reachable Intelligence nodes, including those around Control. Season Rank progression supplies some of the available Paragon points.
Raheir is the defensive main-mercenary choice for this build. Mercenaries unlock during the Vessel of Hatred campaign, and solo play allows a permanent hired companion alongside a situational reinforcement.
Frozen Army alternative: Blight and cold damage
The Frozen Army Diablo 4 Necromancer build uses Blight grouping, cold effects and permanent minions to prepare Army of the Dead burst windows. Treat Odd Star, the full Peace of the Black Shroud set, and Bloodless Scream as one talisman combination.
Skills and upgrades
| Skill | Upgrades and role |
| Skeleton Mage | Coven, Crowd Control Damage Bonus and Duration Damage Bonus support ranged minion pressure. |
| Skeleton Warrior | Litany of Death, Healing and Resolve support frontline damage and durability. |
| Golem | Gargantua, Resolve, Overpower, Ferocity and Unstoppable support the priority-target minion. |
| Blight | Whirlpool groups enemies; Size Bonus expands coverage and Lucky Hit Chance improves proc consistency. |
| Sever | Inexorable Reaper, Cost Reduction, crowd control and corpse generation support repeat casting. |
| Army of the Dead | Dead Cold, Passive Bonus and Cooldown Reduction support burst and battlefield control. |
Talismans and equipment
Pair Odd Star with a full set of five Peace of the Black Shroud pieces and the Bloodless Scream charm, keeping the whole set intact while upgrading single pieces. Bloodless Scream makes Darkness skills chill enemies.
| Slot | Item and sockets |
| Helm | The Undercrown with Igni + Thul. |
| Chest | Runic Mail of Disobedience with Nagu + Que. |
| Gloves | The Hand of Naz supports Skeleton Mages; keep it over a replacement chosen solely for higher item power. |
| Pants | Blood Moon Breeches with two Flawless Horadric Topaz. |
| Boots | Exploiter's Runic Cleats improves control duration and damage against Unstoppable enemies. |
| Weapon | Azurewrath with a Flawless Horadric Sapphire. |
| Amulet | Locran's Talisman with an Abyssal Splinter of Anguish. |
| First ring | Soulwatch Hoop of Frozen Memories with an Abyssal Splinter of Pain. |
| Second ring | Signet of Pelghain with an Abyssal Splinter of Sin. |
| Off-hand | Lidless Wall with a Flawless Horadric Topaz. |
Rotation and positioning
- Enter the encounter with Warriors, Mages and Golem active.
- Put Blight under the main group so Whirlpool gathers enemies into the damage zone.
- Send Golem toward the priority enemy and cast Sever through the group for corpses, control and direct damage.
- Against elites and bosses, activate Army of the Dead once the target is inside Blight and your minions are attacking it.
- Refresh Blight and continue using Sever while the ultimate runs, repositioning without pulling the army away from its target.
For ordinary packs, rely on Blight, Sever and permanent minions, and move on while the army finishes nearly defeated enemies. Rebuild fallen skeletons before committing to another major burst window.