Black Temple is the penultimate raid in World of Warcraft TBC history. This is for sure the symbol of the Burning Crusade add-on. In-world it is located in the eastern part of Shadowmoon valley – the high-level location of Outland. Even to this date, the BT fortress is one of the most grandiose places in the game.
Buy Cheap WoW Classic era Gold
WoW Gold: Your Key to Greatness!

In the raid, your group will meet the 8 bosses followed by the lord Illidan Stormrage himself as the head boss of the dungeon. You will also encounter famous WoW TBC characters – Maev Shadowsong, Akama, and others.
Black Temple Raid Setup
We highly recommend bringing 3 Tanks, 6 Healers, and 16 DPS. This setup is proven to be the most optimal for the Black Temple dungeon back in the days.
Tanks
There are no preferences for the tanks. However, a Druid Tank will be good to have due to evasion for the First Phase of Reliquary of the Lost encounter. Also, at least two of your tanks will have to stack high fire resistance in order to be able to handle the Fire Elementals on Illidan – the last boss of the Black Temple raid.
Healers
During the fights, tanks will get serious damage. We recommend having at least two direct heals focused on the tank healing. The best healing setup for the Black Temple is 2 Holy Paladins, 2 Restore Shamans, 1 Restore Druid, and 1 Holy Priest. Druids need to keep HoTs on the raid at all times, allowing Paladins to focus on the tanks. Shamans, and priests need to focus on the raid healing and assist with tanks.
Damage Dealers
Most encounters in the Black Temple favor ranged damage dealers over melee. You will need 5-7 melee DPS players out of 16. The main thing that damage dealers need to stack for this raid is shadow-resistant gear. The more you have it the more likely you are to defeat Mother Shahraz.
BLACK TEMPLE BOSSES
High Warlord Naj’entus
WoW Classic Anniversary Professions Kits Boost
Enough resources to upgrade your profession to the maximum level!

This is the first boss of the Black Temple raid dungeon. It serves as a gear check due to massive damage and threatening AOE explosion abilities:
- Tidal Burst – the AOE damage explosion that hits all the raid members within 30 yards with 8500 Frost Damage;
- Impaling Spine – the single-target cast with 20 seconds cooldown that does 4513 Physical Damage and puts 30 seconds debuff that inflicts the target with 2750 Physical damage every 3 seconds; The players that are injured by the spine must remove the spine from injured targets to remove the debuff;
- Tidal Shield – puts a shield on the boss and makes him immune to any damage it gets and heals the boss for 1% every 2 seconds. Has a 1-minute cooldown.
Preparation and Tactic
You will need:
- 6-7 healers;
- 1 tank;
- 17-18 DPS (ranged is preferred).
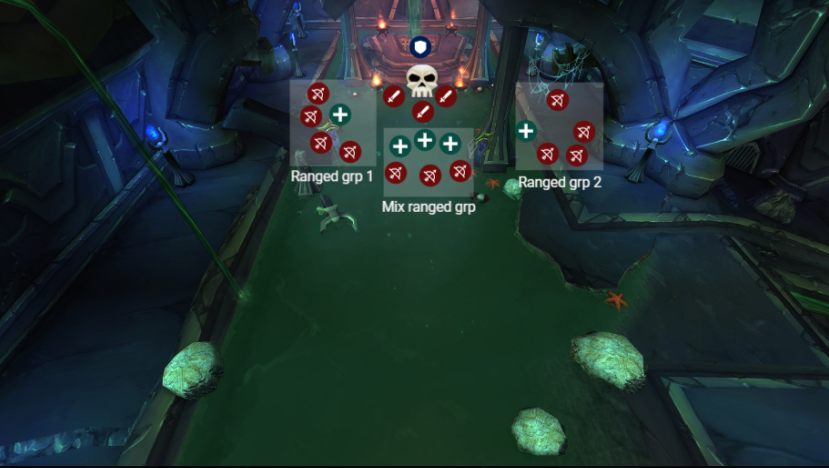
All the raid members need to spread. The boss will be casting the Impaling Spine on random members. The task of players that have not been hit by the spell is to collect Naj’entus Spine from the impaled targets. After 60 seconds the boss will cast the Tidal Shield that will make him immune to any damage. The task of the raid is to use the collected Spine to remove the shield. Keep in mind that removing the shield triggers the Tidal Burst that will damage the entire raid. If your healers have not been able to top up everyone before the Tidal Burst, you can use the Major Frost Protection Potion that will absorb most damage. Also, an option will be to use a frost-resistant gear and put frost-resistant totems in every group.
Supremus
The second boss of Black Temple raid dungeon. Boss has 2 phases and will require every raid member to pay attention. During the encounter Supremus casts a variety of abilities:
- Molten Flame – puts a straight fire line to a random player. Causing 3325 fire damage to the target that stands on it;
- Hateful Strike – damaging 27750 physical damage to the target in melee with the highest health;
- Charge – boss focusing the target and starts chasing it for 10 seconds;
- Molten Punch – knockback and damaging for 5250 physical damage player that became a target of the charge;
- Volcanic Geyser – summons volcanos that fire in random places in 15 yards radius, causing 4163 fire damage.
Preparation and Tactic
You will need:
- 6-7 healers;
- 2 tanks;
- 16-17 DPS (ranged is preferred).
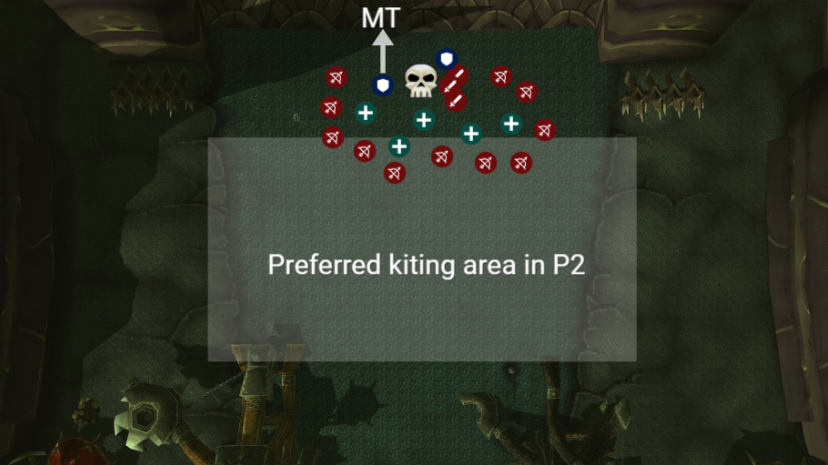
During the first phase, the boss will be doing massive damage to the Main tank with his melee attacks and using Hateful Strike on the Off tank. We recommend at least 3-4 healers focusing on tanks exclusively as they will be the main target. The only notable threat to any payer other than tanks is Molten Flame. After the 60 seconds boss switch to the second phase.
During this phase, all raid members need to spread around and exercise caution. Supremus will charge random targets who have to kite him around the arena. Be mindful of your surroundings and avoid Volcanic Geyser which causes significant damage to any player in its area of effect. After 60 seconds, the boss will switch to phase 1.
All classes that do physical DPS must use the Elixir of Demonslaying, which is extremely effective against the Demon bosses.
Shade of Akama
The third boss of Black Temple raid dungeon. You will meet the shadow of Akama that serves Illidan Stormrage. This is for sure the easiest boss in the dungeon. The Boss himself has no abilities, but his adds have some.
Ashtongue Defender
- Debilitating Strike – deals 100% weapon damage and reduces the physical attack power of the inflicted target for 5 seconds;
- Heroic Strike – increases melee damage done for the next strike for +5088 physical damage;
- Shield Bash – deals 1663 physical damage and interrupts the casting of spells for 3 seconds.
Ashtongue Elementalist
- Lightning Bolt – 1-second cast spell that does 1955 nature damage;
- Rain of Fire – doing 3238 fire damage in 10 yards zone that inflicts every 2 seconds during the 8 seconds.
Ashtongue Rogue
- Debilitating Poison – debuff that slows for 50% spell casting and attack speed. Also doing 1665 damage to the target every 2 seconds during 8 seconds period;
- Eviscerate – finisher that does 1497 physical damage to the target.
Ashtongue Spiritbinder
- Chain Heal – 1-second cast spell that heals up to 5 targets for 6938 health;
- Spirit Mend – an instant cast that gives a buff to the target that heals him for 2500 health every 2 seconds during the 10 seconds.
Ashtongue Sorcerer and Channeler
Channels on the boss that stops his movement.
WoW Classic Anniversary Leveling Boost
Let professionals expedite your power leveling

Preparation and Tactic
You will need:
- 5-6 healers;
- 3 tanks;
- 16-17 DPS (ranged is preferred).
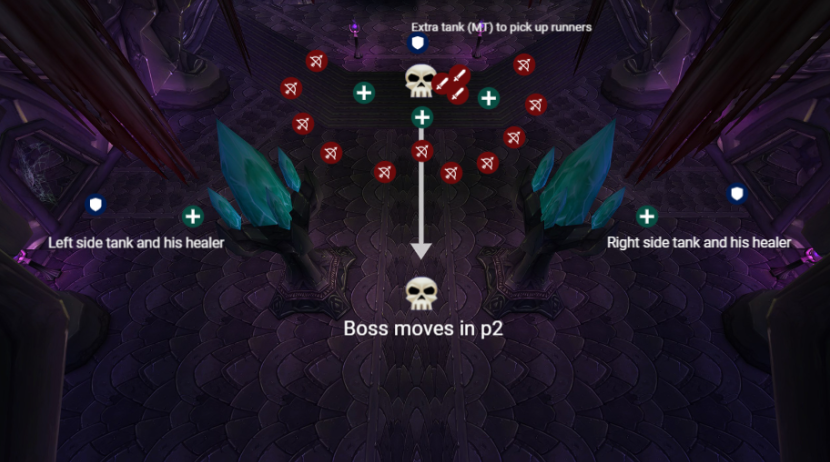
The encounter is divided into 2 phases. In phase 1, you will need to divide the raid into three groups: main DPS that will be killing Sorcerers and Channelers in priority until phase 2, and two adds tanking groups that need to include one healer and one tank on the each of the sides.
In phase 2, you will need to nuke the boss for a 1-minute timer; otherwise, he will murder Akama, and you’ll have to start over. Boss has only 1 million health points
Teron Gorefiend
This is the DPS race boss. Teron has to be defeated to open the Mother Shahraz door.
Abilities
- Incinerate – deals 2775 Fire damage and puts a magical debuff for 3 seconds that inflicts 2775 Fire damage every second; can be dispelled;
- Crushing Shadows – puts a 15-second debuff on a random 5 players that increase shadow damage by 60%;
- Shadow of Death – an ability that puts a debuff that kills a target in 55 seconds. Killed person response for 60 seconds as a ghost and spawns around 4 Shadowy Constructs. Boss casts this ability every 30 seconds.
Preparation and Tactic
You will need:
- 6-7 healers;
- 1 tank;
- 17-18 DPS (ranged is preferred).
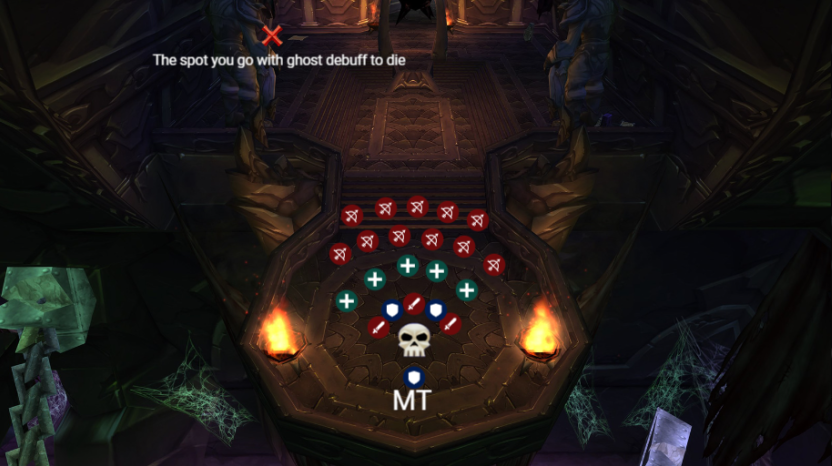
This is a standard gear check. The DPS and healers should position themselves behind the boss. Boss is immune to taunt; all DPS need to be very careful with aggro. Everyone who can should dispel Incinerate debuff as soon as possible. The target of Shadow of Death needs to run far away from the raid to spawn Shadowy Constructs. The main task of a person who becomes a ghost is to control the ads not allowing them to reach the boss.
There is a macro that a player who became a ghost can spam nonstop to make controlling and killing Shadowy Constructs easier:
/click PetActionButton5
/click PetActionButton4
/click PetActionButton3
Gurtogg Bloodboil
WoW Classic Anniversary Hourly Driving
Any Customizable boost on your pleasure

This mutated orc does high damage to the tanks and raid. This boss is the first hard boss you will meet in the Black Temple raid. Boss is a humanoid and has a set of abilities:
- Bloodboil – debuff that casts every 10 seconds; inflicts five people who stand on the biggest range from the boss; doing 600 damage to the target during 24 seconds; Can be removed via using Ice Block and Divine Shield;
- Arcing Smash – frontal cone AoE; on the second phase, halves the incoming healing for 4 seconds;
- Fel Rage – the debuff that the boss casts on a random player every 90 seconds; duration of 30 seconds; chosen target gets +300% damage, +30000 health, +15000 armor, +100% healing, and becomes the target of the boss till the end of debuff or till it will be removed; Also increases the damage of the Gurtog;
- Fel-Acid Breath – the debuff that does 2850 nature target to its target; will be put on a random player in front of the boss. On the second phase casts it on the target of Fel Rage ;
- Acidic Wound – 1-minute debuff that reduces 500 armor and does 300 nature damage every 3 seconds; boss uses it every 2 seconds; it is impossible to remove it. You can only avoid it via parry, dodge, miss mechanics;
- Eject – knock back the chosen target and reduce its threat;
- Bewildering Strike – disorient the target for 5 seconds;
- Acid Geyser – doing 5000 nature damage to the target of Fel Rage and everyone within 5 yards;
- Insignificance – casts on all the raid members during phase 2, not allowing them to generate aggro.
Preparation and Tactic
You will need:
- 6-7 healers;
- 3 tank;
- 15-16 DPS (ranged is preferred).
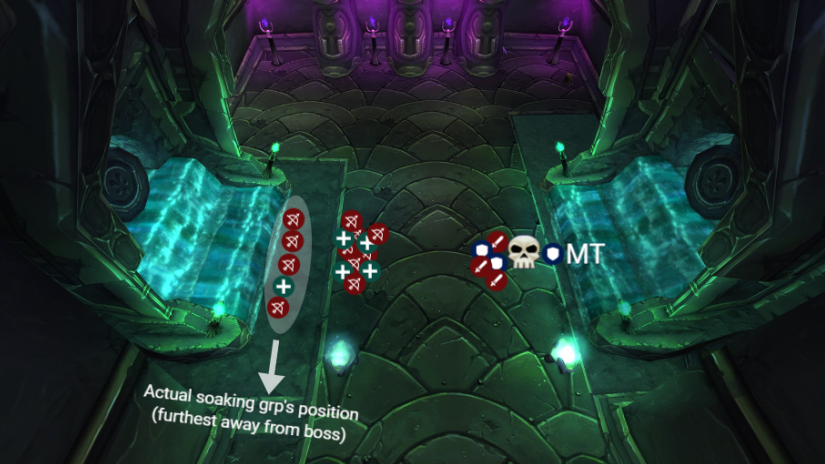
Boss has 2 phases that take 90 seconds: 60 seconds for one phase and a 30-second for another phase.
The first phase will require your ranged DPS and healers to split into three groups of 5 people, each soaking a Bloodboil debuff. Groups will need to rotate by command of the raid leader to avoid getting more than one stack of the debuff. At the same time, DPS need to be mindful of their aggro, as the main task in phase one is to allow your tanks to take the top 3 places for easy rotations. Because of the Acidic Wound, it is recommended for tanks to rotate every 20 stacks.
During phase 2, all the healers need to focus on the Fel Rage target. Your paladins need to be ready to give the Blessing of Protection in critical situations. Nothing special about this phase. Just heal the Fel Rage target and don’t stand in front of the boss.
Reliquary of Souls
This hard DPS check boss includes 3 mini-bosses (phases) – Essence of Suffering, Essence of Desire, and Essence of Anger. Each of the bosses has its abilities; however, every phase will require your raid to do as much as possible damage.
Abilities
Essence of Suffering
- Aura of Suffering – an aura that removes the regeneration, healing by 100%;
- Enrage – boss increases his attack by 25% and attack speed by 50% for 15 seconds; cooldown 45 seconds;
- Soul Drain – drains 2625 health and mana from 3 random targets for 30 seconds; this debuff is dispellable;
Essence of Desire
- Aura of Desire – an aura that returns 50% of the damage done back to the players; increases healing done by 100%; reduces 5% of mana every 8 seconds;
- Deaden – 1-second cast spell that increases the taken damage by 100% for 10 seconds;
- Spirit Shock – 1-second cast spell, doing 9250 arcane damage to a random target and put 5 seconds of confusion debuff;
- Rune Shield – buff of shield that absorbs 50000 damage, gives immune to interruptions, increases attack and spell casting for 100% for 15 seconds;
Essence of Anger
- Aura of Anger – an aura that does 100 shadow damage per tick every 3 seconds and gives 5% damage done buff; each tick damage increases by 100 and damage done buffs for 5% extra;
- Seethe – after switching a target boss gets 100% attack speed increase buff and put on raid 200% aggro generation debuff for 10 seconds;
- Soul Scream – doing cone 2625 shadow damage to 5 targets in the range of 10 yards, also burning for 4375 rage/mana (0.5 damage per 1 mana or 1 rage per 100 damage); have 10 seconds cooldown;
- Spite – give 2 seconds immune to 3 random targets and then damaging for 7444 nature damage, then gives immune for 2 seconds again.
Preparation and Tactic
You will need:
- 6-7 healers;
- 3 tank;
- 15-16 DPS.
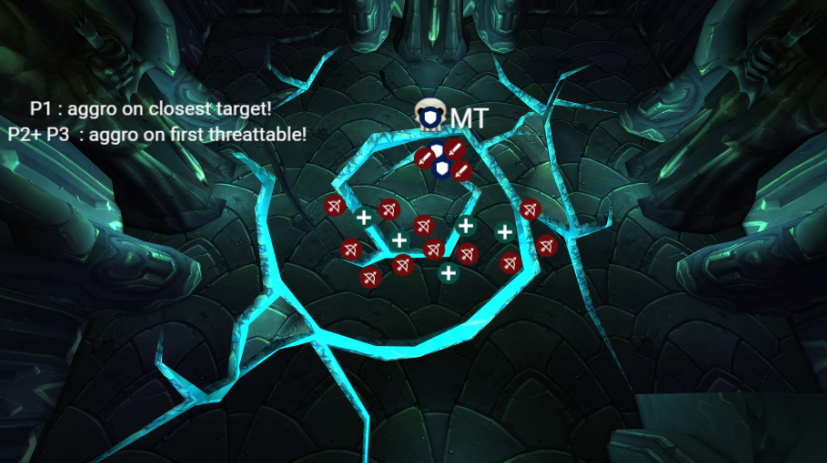
The boss has 3 phases. Killing each essence provokes the transition to the next phase:
Phase 1
During this phase, healing is impossible. All healers will have to do as much damage as they can. Do not worry about mana as at the end of each phase it will be fully restored. Tanks should be switching on 15-20% of health. When bost casts Enrage it is better to let a rogue tank. Remember that aggro is irrelevant during this phase. The boss automatically focuses on the closest target.
Phase 2
In this phase, healers need to be ready for big damage to the raid as the boss reflects it to the damage dealers. Be mindful of your DPS as it is inflicted back on you. If you are on low health it is better to stop damaging the boss, than die. Also, it is very important to interrupt Spirit Shock during this phase. We recommend putting 2 or 4 kickers that will rotate their kicks one by one.
Phase 3
WoW Classic Anniversary Leveling Boost
Let professionals expedite your power leveling

Just a DPS race phase. All DPS need to be careful with aggro. Remember that if the boss will switch the target it may wipe the raid. We recommend waiting 10-15 seconds and casting a Bloodlust during this phase.
Mother Shahraz
This is a challenging battle that requires a good shadow resistance to defeat it easily. Your raid will need to make an impressive DPS to burn it down fast. Healers need to be ready that tanks will be hit by serious damage. You can only get access to The Illidari Council chamber once Mother Shahraz is defeated. It has the following abilities:
- Saber Lash – doing near 30k damage that is spread among 3 targets;
- Fatal Attraction – teleports 2-3 random targets and puts debuff that doing near 3000 AOE damage till the chosen targets will not get 25 yards distance from each other;
- Silencing Shriek – gives silence for 9 seconds to everyone in 18 yards range;
- Prismatic Aura – an aura that increases damage done to the boss with some magic school and reduces it by 25% every 15 seconds.
Beams:
- Vile Beam – deals 2500 shadow damage per tick during the 8 seconds period;
- Wicked Beam – deals 4000 shadow damage and 1000 mana burn to the target;
- Sinister Beam – deals 2000 shadow damage and 50% of normal fall damage;
- Sinful Beam – does up to 7000 shadow damage to the target.
Preparation and Tactic
You will need:
- 6-7 healers;
- 3 tanks;
- 15-16 DPS.
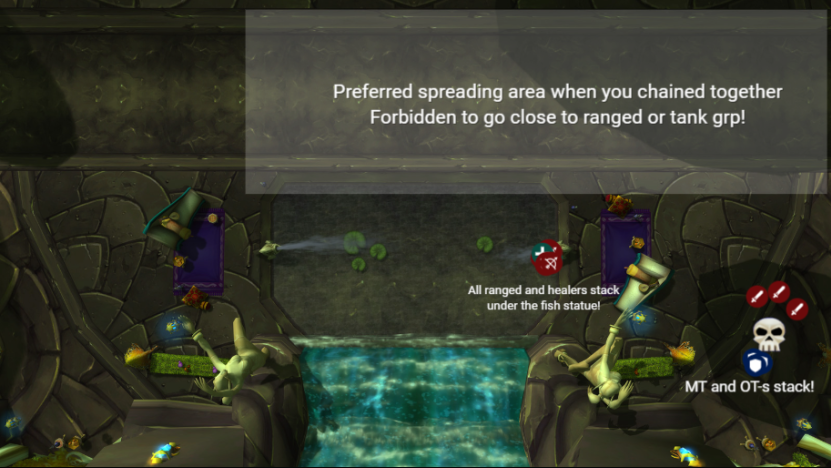
The raid should be divided into 3 camps – melee, range, and tank. The boss is quite static, however, you need to be mindful of a few things. When the boss casts Fatal Attraction all the chosen targets should run away in different directions to be 25 yards away from each other. Be ready to run very fast, as usual, 1-2 seconds of delay may cause death of your character. Never run into one of the camps as it may wipe the raid.
Also, be ready to buy or craft some shadow resistance gear to make your life easier.
Illidari Council
This is the penultimate boss of the Black Temple raid. The Council consists of 4 blood elves mini-bosses that have a merged HP. Means damaging one every boss gets damage. This is by far the longest encounter in all the raid. The Council members have the following abilities:
Lady Malande
- Circle of Healing – casts 2.5 seconds to heal for 100 000 health; has 20 seconds cooldown;
- Divine Wrath – casts 2 seconds spell that does 5000 holy damage to the target and put debuff for 8 seconds that does 2500 Holy damage every 2 seconds;
- Empowered Smite – casts 2 seconds spell that does 5463 Holy damage to the target;
- Reflective Shield – gives a shield for 20 seconds to Lady Malande that absorbs 25000 physical or magical damage.
High Nethermancer Zerevor
- Arcane Bolt – 2 seconds cast that does 15000 Arcane damage to the target;
- Blizzard – casts a 10 yard AOE rain for 12 seconds that does 4375 frost damage every 2 seconds;
- Dampen Magic – self-buff that reduces the magic damage taken by 75% and healing taken by 500;
- Flamestrike – casts a 10 yards AOE explosion that doing initially 4625 fire damage and 2806 fire damage every 2 seconds for 12 seconds;
Gathios the Shatterer
- Blessing of Protection – 15 seconds buff that gives immune to the physical damage;
- Blessing of Spell Warding – 15 seconds buff that gives immune to the magical damage;
- Chromatic Resistance Aura – gives 30 seconds buff to the all allies that give 250 resistance to the all magical schools; 1 min cooldown;
- Devotion Aura – gives 30 seconds buff to all allies that give extra 20% armor; 1 min cooldown;
- Consecration – uses 10 yard AOE under the boss that does 2250 damage every 3 seconds during 21 seconds; 30 seconds cooldown;
- Hammer of Justice – stuns a random target for 6 seconds;
- Hammer of Justice – using the judgment that depends on the seal used by the boss doing 7000 holy damage (seal of command) or put a debuff that does 11000 holy damage during 8 seconds (seal of blood);
- Seal of Blood – gives 30 seconds buff that gives extra 800 holy damage to the boss attacks;
- Seal of Command – gives 30 seconds buff that gives 70% extra holy damage to the boss attacks.
Veras Darkshadow
- Deadly Poison – put debuff that does 1000 nature damage per second for 4 seconds;
- Vanish – boss becoming invisible; 30-second cooldown.
Preparation and Tactic
You will need:
- 7-8 healers;
- 3 tank;
- 1 mage tank;
- 13-14 DPS.
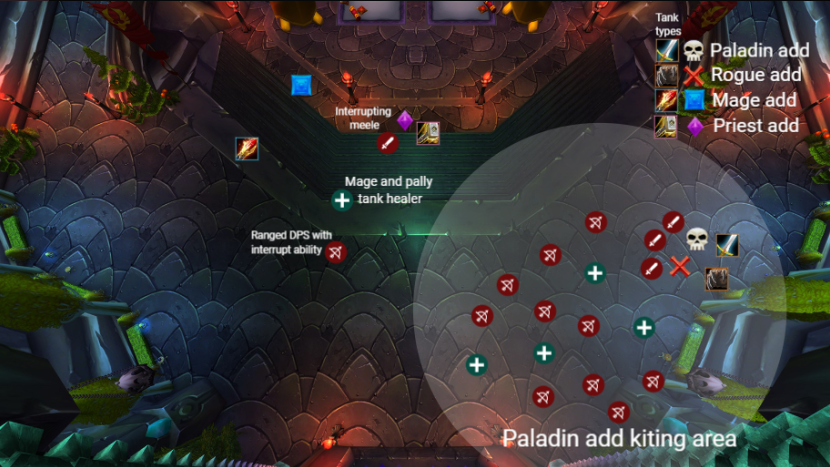
This is a hard fight that will require your raid to cooperate very well. Boss has merged health which means doing damage to any of them injures them all. First of all, you need to put 1 tank on each boss. Zerover should be tanked by a mage. The raid needs to spread for more than 10 yards from each other to prevent the Arcane explosion. The mage that will be tanking Zerover should spell steal Dampen Magic buff as fast as possible.
It is very important to interrupt the Circle of Healing spell of Lady Malande. You should put a minimum of 2 interrupters (1 physical and 1 magical) to guarantee that this spell never goes off because if it does, the boss will be healed for 100000 health. All the DPS should focus on Gathios. Keep an eye on AOE abilities – any combination of Blizzard, Flamestrike, and Consecration will certainly lead to your untimely demise.
Illidan Stormrage
This is the last boss of the Black Temple raid and one of the most iconic characters in the history of WoW TBC. Also, killing him is the final objective for the Black Temple questline. Illidan makes use of a wide variety of abilities during the encounter:
WoW Classic Anniversary Professions Kits Boost
Enough resources to upgrade your profession to the maximum level!

- Agonizing Flames – damaging a random target for 5000 fire damage and putting a debuff that does a total of 36000 periodical fire damage during 60 seconds;
- Aura of Dread – doing 1k damage to everyone in 15 yards range from the Illidan and gives a debuff that increases by 30% incoming shadow damage; debuff stacks with a time;
- Dark Barrage – doing huge shadow damage – 3000 damage every second for 10 seconds to a random target;
- Draw Soul – 1.5 seconds cast frontal AOE that deals 5000 damage and heals Illidan for 100 000 health per target it hits;
- Enrage – gives increased damage buff to Fire elementals in case any member of the raid stands for more than 25 yards from the elemental;
- Fireball – 2 seconds cast that doing 3000 fire damage to a target and 10 yards from it;
- Flame Burst – doing 3500 AOE fire damage for 5 yards to every raid member;
- Parasitic Shadowfiend – 10 seconds debuff that does 3000 shadow damage per tick every 2 seconds, at the end of the debuff spawns 2 parasites;
- Shadow Blast – every 2 seconds cast that doing 11000 shadow damage to the target with the highest aggro; have 20 yards AOE range damage area;
- Shear – debuff that reduces the maximum hp of the target by 60% for 7 seconds.
Preparation and Tactic
You will need:
For burst tactic:
- 6 healers;
- 3 tank;
- 16 DPS (ranged is preferred).
For non-burst tactic:
- 7-8 healers;
- 3 tank;
- 1 warlock tank
- 13-14 DPS (ranged is preferred).
Boss has 5 phases:
Phase 1
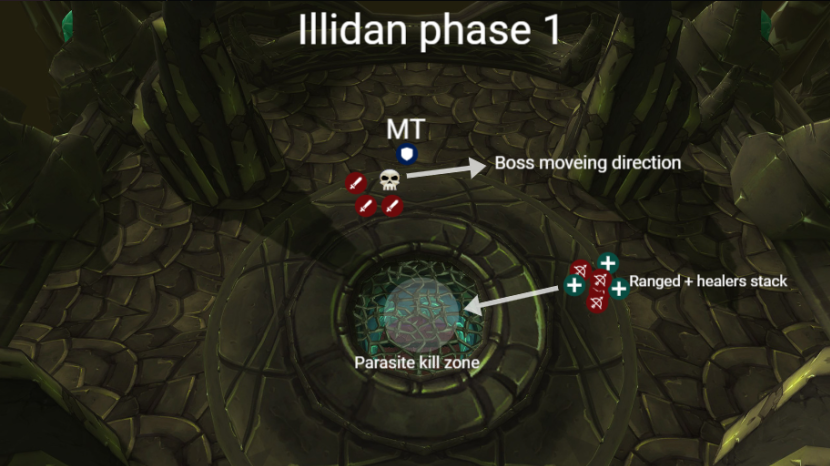
During this phase, you will need one main tank. Illidan will attempt to heal so make sure to apply healing debuff to prevent it. Be careful with Parasitic Shadowfiend and spawn it in the correct place. Phase 1 will be going till 65% health of the boss.
Phase 2
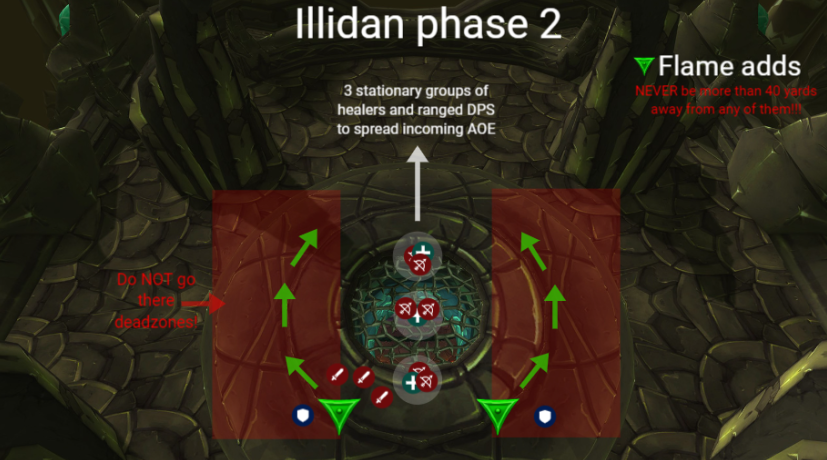
During this phase, the boss will fly up and raid and will need to fight with two fire elementals. For this phase, you will need to use 2 remaining tanks in the fire resistance set. All the raids need to spread into 4 groups to share incoming AoE damage. After killing the elementals Illidan will fly down.
Phases 3&4
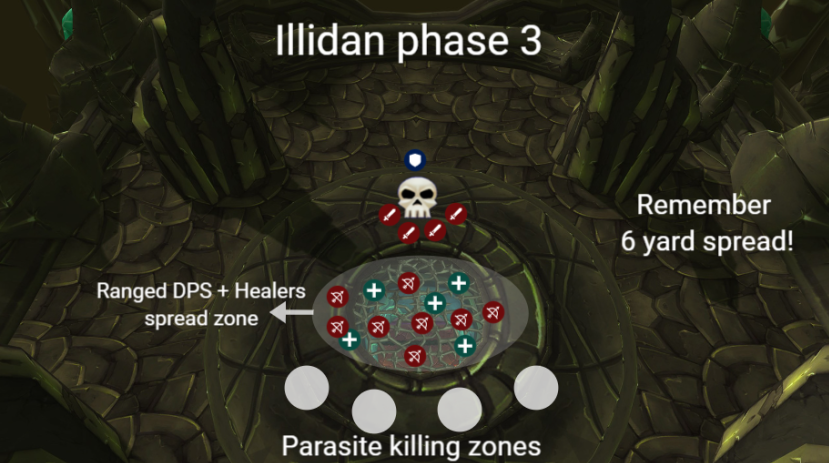
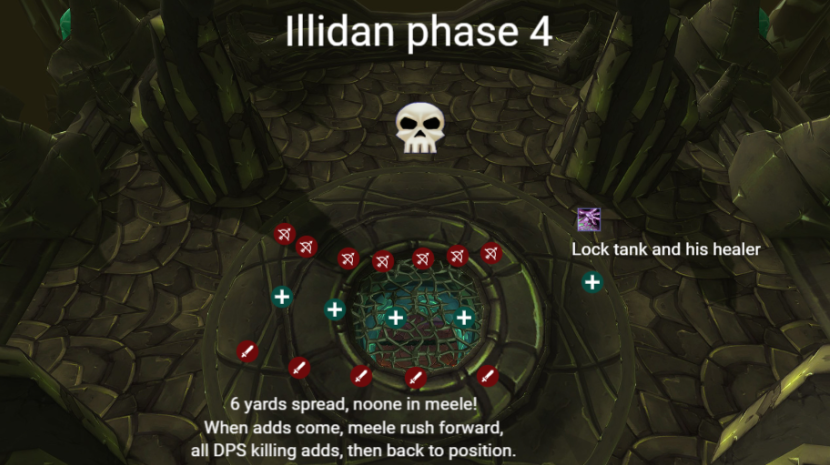
Boss will be switching phases between phases 3 and 4 until he reaches 30%. However, with a burst setup, you can keep phase 4 and burst the boss to 30% for 55 seconds of time. During this phase, nothing new happens. Boss will use the same abilities as in phase 1. If you can’t defeat the boss without phase 4, you will need to be ready to spread out and kill the shadow hunters.
Phase 5
After reaching 30% you can be sure that you will kill the boss. Just focus on healing the boss on enrage and finish it. Boss does not do anything special just the same abilities as before.

