Aberrus, the Shadowed Crucible Guide
Published on: 7 May, 2023 | Last Updated on: 18 May, 2023
Introduction
Welcome to our comprehensive Aberrus, the Shadowed Crucible Guide, the first and highly-anticipated raid in the Dragonflight expansion. This guide is designed to help novice and seasoned players navigate the intricacies of this mysterious and challenging raid, featuring nine formidable bosses and a gripping storyline that unfolds as you progress.
Set deep within the long-forgotten laboratory of Neltharion, Aberrus, the Shadowed Crucible, is a hidden crucible of immense power. Millennia ago, Neltharion, also known as the Earth-Warder, used this secret facility to conduct world-altering experiments that are now being sought after by various forces. The Azeroth champions must explore the gloomy depths of Aberrus and safeguard Neltharion’s perilous secrets and power from falling into the hands of malevolent entities.
As you embark on this perilous journey, you’ll encounter diverse bosses, each with its unique mechanics and challenges. Our Aberrus, the Shadowed Crucible Raid Guide, will be your trusted companion throughout this adventure, providing crucial information on release schedules, raid locations, boss overviews, loot drops, and rewards. Unravel the mysteries of Dragonflight and ensure the safety of Azeroth as you conquer Aberrus, the Shadowed Crucible.
Raid Release Schedule for Aberrus, the Shadowed Crucible in Dragonflight
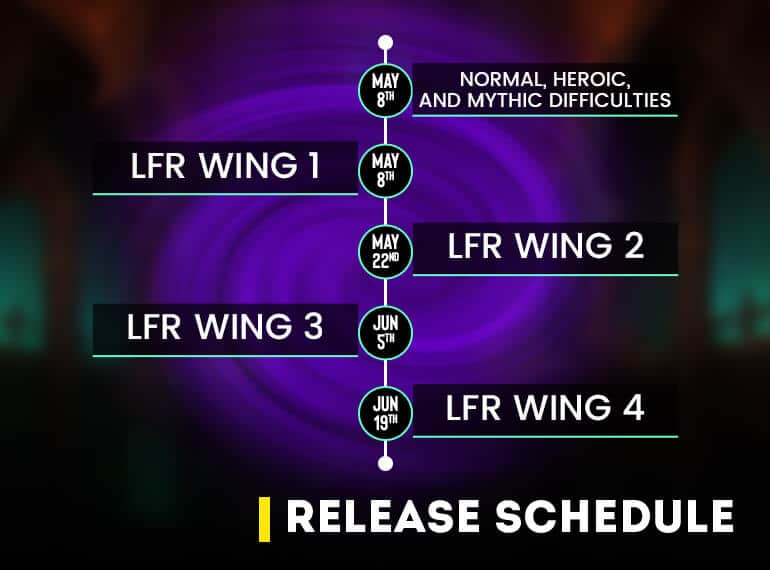
The Aberrus, the Shadowed Crucible raid in Dragonflight, will be released across multiple difficulties, catering to various player skill levels. The raid will launch with Normal, Heroic, and Mythic difficulties, followed by a staggered release schedule for the Looking for Raid (LFR) wings. Here’s a detailed overview of the release dates for each difficulty and the LFR wings:
- Normal, Heroic, and Mythic Difficulties: Open the week of May 8, 2023. Cross-faction will be available immediately, and the Mythic Aberrus, the Shadowed Crucible Hall of Fame, will feature a combined top 200 guilds for both Horde and Alliance sides.
- LFR Aberrus, the Shadowed Crucible Releases: The Looking for Raid (LFR) Aberrus will be released across four wings, each with its staggered schedule:
- Week of May 8: LFR Wing 1 – The Discarded Works (Kazzara, the Hellforged, The Amalgamation Chamber, The Forgotten Experiments)
- Week of May 22: LFR Wing 2 – Fury of Giants (Assault of the Zaqali, Rashok the Elder, The Vigilant Stewart, Zskarn)
- Week of June 5: LFR Wing 3 – Neltharion’s Shadow (Magmorax, Echo of Neltharion)
- Week of June 19: LFR Wing 4 – Edge of the Void (Scalecommander Sarkareth)
Stay tuned for updates and in-depth strategies as each wing of the LFR Aberrus, the Shadowed Crucible raid, is released.
How to Find Aberrus, the Shadowed Crucible in Dragonflight
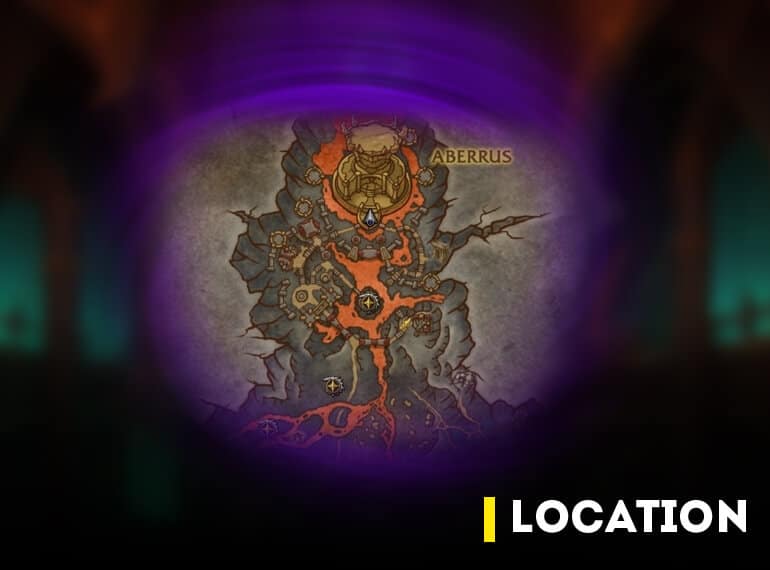
Players must go to the northern half of the Zaralek Cavern to access the Aberrus, the Shadowed Crucible raid. The entrance to the raid can be found at the following coordinates: /way #2133 48.46 10.35. Explore more about all the activities in a new location in our Zaralek Cavern Guide for more insight.
Obsidian Rest, a little way south of the raid entry, has the closest flight point to the raid entrance. Once you reach Obsidian Rest, head north to find the entrance to Aberrus, the Shadowed Crucible.
Tip: Players can click on the map to zoom in and get a better view of the raid location and the surrounding areas. This will make it easier to locate the entrance and ensure a smooth journey to the starting point of the raid.
Keep this information handy to avoid getting lost while searching for the Aberrus, the Shadowed Crucible raid entrance, and be prepared to face the challenges that await you.
Boss Overview for Aberrus, the Shadowed Crucible in Dragonflight
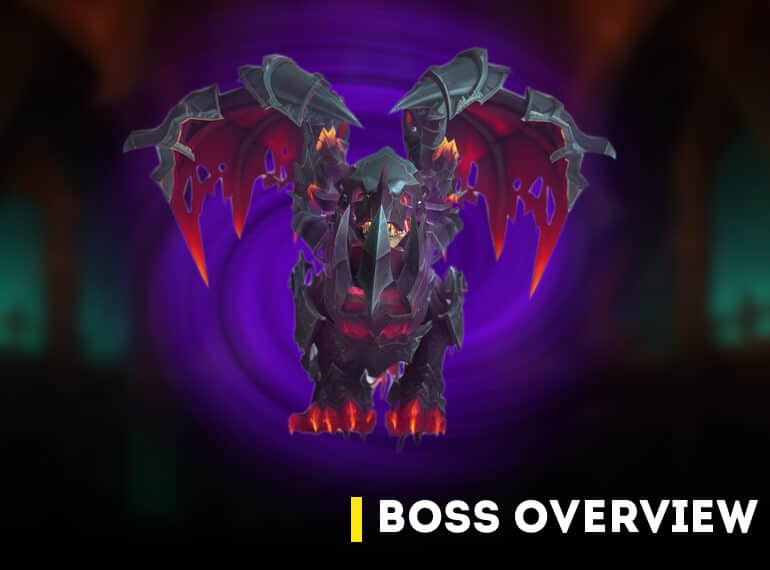
Aberrus, the Shadowed Crucible raid features nine challenging boss encounters. Here is a brief introduction to each boss:
- Kazzara, the Hellforged: A fearsome and powerful foe, Kazzara is a fiery adversary that players must defeat to progress through the raid.
- Amalgamation Chamber: This encounter consists of three entities: Eternal Blaze, Essence of Shadow, and Shadowflame Amalgamation. Players will need to overcome these elemental forces to succeed.
- The Forgotten Experiments: A trio of horrifying creations – Neldris, Thadrion, and Rionthus – this encounter will test players’ ability to adapt and strategize against multiple opponents.
- Assault on the Zaqali: Led by Warlord Kagni, players must face the relentless onslaught of the Zaqali forces in this encounter.
- Rashok, the Elder: A powerful and ancient being, Rashok presents a formidable challenge to players with his devastating abilities.
- Zskarn, the Vigilant Steward: Tasked with protecting the secrets of Aberrus, Zskarn will test players’ coordination and teamwork to be defeated.
- Magmorax: This molten monstrosity will require players to be on their toes as they avoid his fiery attacks and bring him down.
- Echo of Neltharion: A haunting reminder of Neltharion’s past, the Echo of Neltharion will test players’ resolve and determination as they face this spectral adversary.
- Scalecommander Sarkareth: The final boss of the raid, Scalecommander Sarkareth, will push players to their limits with her cunning strategies and devastating abilities.
Be prepared to face these nine bosses in the Aberrus, the Shadowed Crucible raid, as you venture through the depths of Dragonflight’s first raid.
Aberrus the Shadowed Crucible Bosses Strategy
Kazzara, the Hellforged
Recommended Setup: 2 Tanks / 4 Healers / 14+ DPS
Boss Abilities
- Hellsteel Carnage: Triggered at 70%, 50%, and 30% of Kazzara’s HP. It Inflicts raid-wide damage and applies a permanent DoT on the entire raid. Be careful as Hellsteel Fragments and Revenant’s Blood puddles appear, which must be dodged.
- Dread Rifts: Targets several players who will create a Rift (puddle) after 5 seconds. It damages players within 5 yards.
- Rays of Anguish: Random players are targeted by a laser (Red Arrow) that follows them, causing damage and leaving fire puddles. To remove the laser, kite it into a Dread Rift.
- Hellbeam: At 100 energy, Kazzara targets a random player and casts a fire breath in their direction. Players need to avoid this attack.
- Wings of Extinction: Deals damage to all players with a small knockback and applies a small DoT.
- Terror Claws: A tank ability that inflicts damage and applies a DoT. Increases damage taken from Terror Claws by 200% for 25 sec. Necessitates a tank swap.
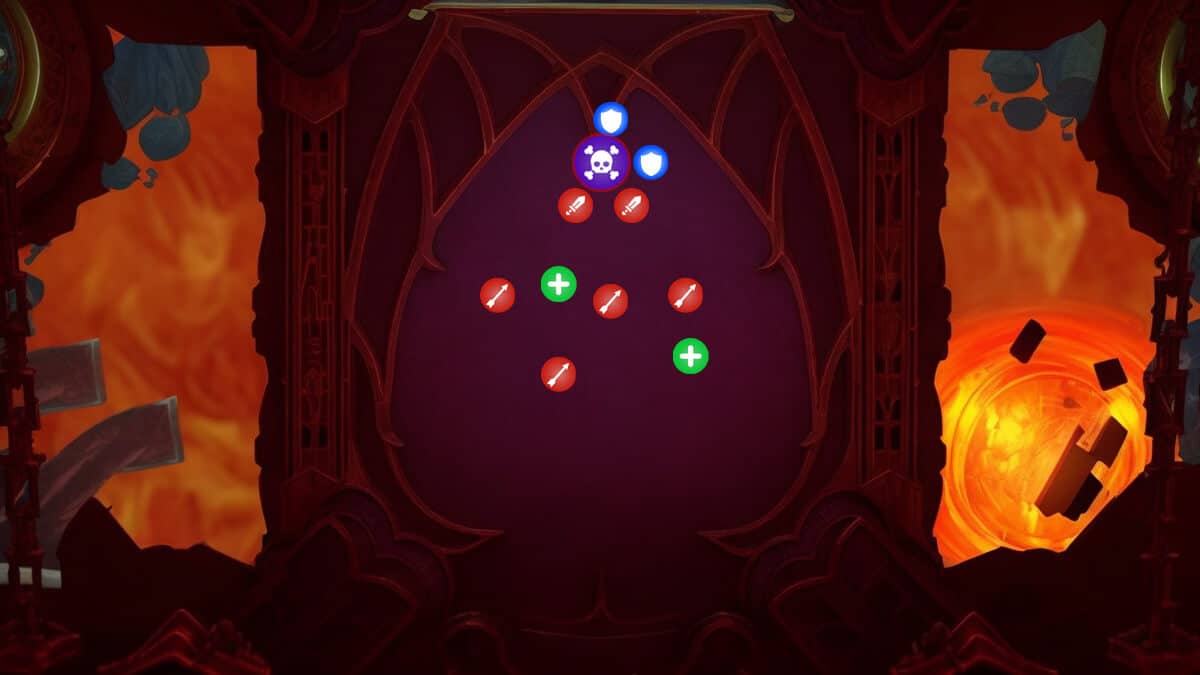
Strategy
- Tanks should position Kazzara in her starting location and face her away from the raid.
- Use Hero/Lust on pull and maintain a loose spread behind the boss to dodge lasers and bait other abilities.
- Avoid only the puddles and take raid-wide damage when Kazzara reaches 70%, 50%, and 30% HP.
- To remove Rays of Anguish, kite them into Dread Rift’s puddles.
- Evade the Hellbeam when Kazzara reaches 100 energy.
- Be mindful of the knockback from Wings of Extinction, and avoid being knocked into lasers or puddles.
- Raid-wide damage significantly increases in the final 30% of Kazzara’s health. Prevent unnecessary damage to avoid deaths.
Buy Aberrus Heroic Boost
Claim New Loot And Great Vault Rewards
Amalgamation Chamber
The Amalgamation Chamber is a single-target boss fight that consists of two phases. In the first half of the battle, players confront two bosses, which eventually merge into a single, more powerful boss. Throughout the fight, players must navigate some difficult mechanics that test their ability to dodge and soak incoming attacks. As the encounter advances, the challenge intensifies, pushing both DPS and healers to their limits.
Recommended Setup: 2 Tanks / 4-5 Healers / 13-14+ DPS
Boss Abilities
Krozgoth
Corrupting Shadow: A DoT that affects players within the boss’s range, reducing health by 2% and dealing 12,500 damage every 5 seconds for each stack.
Coalescing Void: A bomb that spawns from a random player, inflicting 250,000 damage upon detonation; the damage decreases with distance.
Umbral Detonation: Circles appear around several players, dealing 50,000 damage to nearby players after 6 seconds and leaving a puddle on the ground.
Shadows Convergence: Orbs emerge behind players, moving toward the boss and dealing 156,000 damage if they collide with a player.
Shadow Spike: Deals 110,000 Shadow damage to the tank and applies Corrupting Shadow. Immunity can be used to reset stacks.
Moltannia
Blazing Heat: A DoT that affects players within the boss’s range, dealing 3,000 damage every second.
Fiery Meteor: A massive swirl on the ground that requires numerous players to divide to absorb the damage.
Molten Eruption: Numerous small swirls appear around the boss and must be soaked. Soaking one inflicts 50,000 damage; failing to soak one deal 124,800 damage to the entire raid.
Swirling Flame: Several fire tornadoes are unleashed in a frontal cone shape toward a random player, requiring evasion.
Flame Slash: Deals 109,000 Fire Damage to the tank and stacks Blazing Heat. Players can use immunity to reset stacks.
Molgoth
Shadowflame Contamination: A DoT that affects players within the boss’s range, inflicting fire damage and reducing health.
Gloom Conflagration: A big swirl on the ground that necessitates the participation of numerous players to absorb the damage by splitting it.
Blistering Twilight: Circles appear around several players, dealing 93,000 damage to nearby players after 5 seconds and leaving a puddle on the ground.
Convergent Eruption: Numerous small swirls appear around the boss and must be soaked. Soaking one deals 62,400 damage; failing to soak one deals 155,000 damage to the entire raid.
Withering Vulnerability: Strikes the tank for 310,000 Physical damage and increases Shadowflame damage taken by 200%.
Shadowflame Burst: A frontal attack that deals 250,000 Shadowflame damage.
Strategy
Two popular Phase 1 strategies exist: No Boss Swap and Boss Swap. Regardless of the chosen strategy, the initial setup remains consistent, with ranged players targeting Krozgoth and melee players focusing on Moltannia. Aim to simultaneously get both bosses down to 50% health to reduce Molgoth’s HP pool.
No Boss Swap Strategy
Bosses never swap sides, and each group only deals with their side’s boss abilities for the entirety of Phase 1. The downside of this strategy is that damage taken towards the end of the phase will ramp up, so healers need to be ready for that. After the bosses turn into Molgoth, stacks will reset.
Boss Swap Strategy
In this strategy, tanks switch bosses midway through Phase 1. This approach prevents Shadow/Fire stacks from accumulating too much, but players must adapt to different abilities when the new boss comes within range.
Phase 1
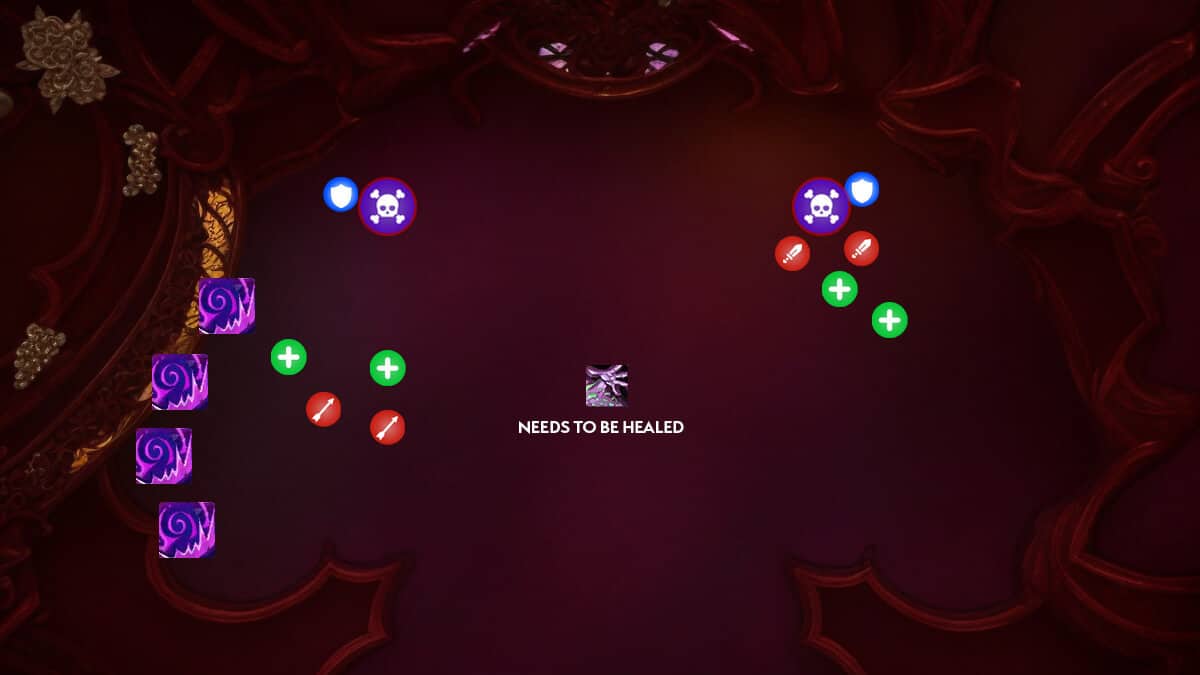
Strategy Krozgoth Side
- Position Umbral Detonation swirls to the side or back to allow more space in the center.
- Ranged players can group up and lure the Coalescing Void bomb towards them, then use the Warlock gateway to move away swiftly.
- Avoid Shadows Convergence orbs that appear at the back of the room and approach the boss.
- Watch for fire tornadoes originating from the opposite side of the room.
- Utilize personal/external defensive abilities for Umbral Detonation and powerful raid cooldowns for Coalescing Void when stacks become overwhelming.
Moltannia Side
- Establish a soaking rotation for Fiery Meteor, utilizing players with immunities to prevent unnecessary stacks from multiple people soaking.
- Absorb Molten Eruption circles to avoid harming players on the other side due to decreased HP from Corrupting Shadow stacks.
- Lure and evade Swirling Flame in the safer area of the room.
Phase 2
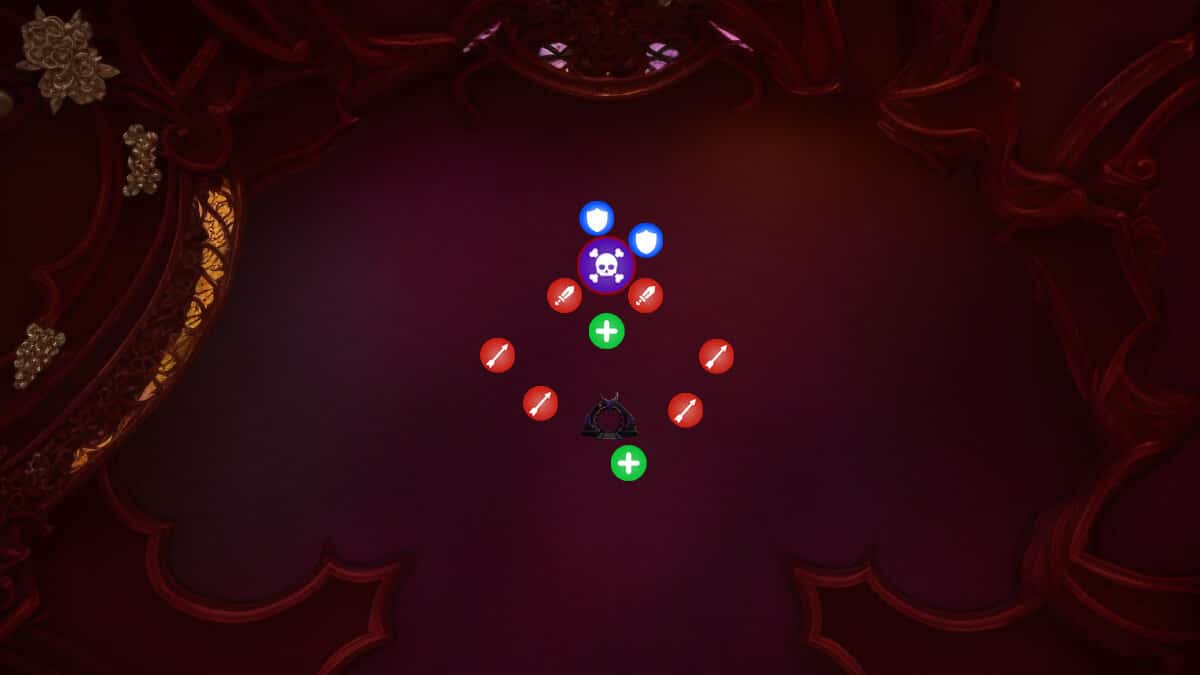
Strategy As soon as one of the bosses reaches 50% health, Phase 2 commences. If implementing the “no boss swap” strategy, gather in the center of the room during the transformation to facilitate healing until stacks are reset.
Activate Hero/Lust during this phase to defeat the boss quickly before stack damage becomes too high. Depending on the push timing, hold off on Hero/Lust until the main DPS cooldowns are ready or the execution phase begins.
Tanks must keep the boss facing away from the raid due to the frontal Shadowflame Burst and avoid being hit by significant abilities that inflict Shadowflame damage if they have a vulnerability debuff.
Melee players should endure the damage from Gloom Conflagration (Meteor) and then utilize the Warlock gate to walk away from the Coalescing Void bomb that remains, reducing the damage incurred. Like in Phase 1, immunities are also a viable option.
When attacked by Blistering Twilight, players must move away from the raid to safely deploy fire puddles and give others more room to avoid the fire tornadoes that emerge upon hit.
Everyone must absorb the Convergent Eruption rings and dodge the Orbs that arise thereafter. Failure to soak even one circle may result in a wipe.
The Forgotten Experiments
The Forgotten Experiments is a thrilling three-boss boss fight with a single-target/light add-cleave battle style. Players must face unique mechanics as they progress through each boss, including the final boss that tests their football skills. Forgotten Experiments is a challenging fight; you need to prepare your group that it will not be an easy trip.
Recommended Setup: 2 Tanks / 4-5 Healers / 13+ DPS
Boss Abilities
Neldris
- Rending Charge: Targets and charges at four players, applying bleed. Other players must dodge the charge path.
- Massive Slam: Dodge massive swirls around the boss, which deal 218,000 physical damage if hit.
- Bellowing Roar: Move away from the boss to avoid distance-based AoE, dealing up to 218,000 arcane damage.
- Infused Strikes: Tanks receive stacking arcane damage DoT. Reset stacks by touching another player, causing raid damage.
Thadrion
- Unstable Essence: Dispel DoT when stacks are high. Kill the add spawned after dispelling quickly.
- Volatile Spew: Dodge ground swirls that deal 220,000 arcane damage if hit.
- Violent Eruption: For 8 seconds, the boss will deal 47,000 arcane damage to all players.
- Infused Strikes: Tanks receive stacking arcane damage DoT. Reset stacks by touching another player, causing raid damage.
Rionthus
- Deep Breath: The boss will fly in all directions, causing deadly damage to anybody who comes into contact with it. At all costs, avoid.
- Temporal Anomaly: A ball of light you must intercept to kick away. If it reaches the boss, he will receive an absorb shield worth 10% of his health. The player who knocks the ball takes harm as well.
- Disintegrate: For 3 seconds beam will shoot at numerous players, delivering 25,000 Spell Frost damage every second. Following that, targeted players are slowed by 30% for 16 seconds and do damage to anybody within 5 yards. Spread to avoid hitting nearby players with a beam.
- Infused Strikes: Every melee assault deals 12,000 arcane damage every second, and it accumulates. Touching another player resets the stacks but does 15,000 arcane damage to the raid and applies a DoT that ticks for 12,000 arcane damage.
Strategy
Fight Overview
- In this order, you must fight one boss at a time: Neldris > Thadrion > Rionthus.
- Only defeating each boss to 0% health will make the next boss engage in the fight.
- You must process the fight and dodge abilities in the relatively small room.
Neldris
Neldris is a boss who avoids extra Rending Charge stacks and dodging abilities. The fight is relatively straightforward, with the bleed effect from Rending Charge being weak and disappearing once Neldris is defeated.
- Rending Charge: Ensure players avoid getting hit by the charge to prevent additional stacks. Keep communication clear and dodge the charges effectively.
- Swirls and Bellowing Roar: Players must dodge swirls around the boss. Additionally, melee players should move out of melee range when Bellowing Roar is being cast to avoid taking maximum damage.
Thadrion
Thadrion is a more challenging boss, you will need to kill him quickly to avoid extra Unstable Essence applications. Proper management of Unstable Essence and strong healing are crucial for success.
- Hero/Lust and Cooldowns: Use Hero/Lust and ensure all cooldowns are available to kill Thadrion as quickly as possible.
- Unstable Essence: Hold the Unstable Essence DoT for as long as possible before dispelling to minimize add spawns. Players should be about 10 yards away from the boss when dispelling, allowing them to move the boss on top of the add for extra cleave.
- Violent Eruption: Healers must be prepared for the moderate raid-wide damage caused by Violent Eruption, especially if leftover adds are alive. Ensure all adds are killed before Violent Eruption occurs.
- Swirls: Dodge swirls to avoid taking significant damage.
Tip: Place a world marker for players carrying the Unstable Essence debuff to stack on. Mass dispel and move the boss on top of the adds, then use AoE abilities to eliminate them quickly.
Rionthus
Rionthus is the final boss in the encounter, focusing on handling Unstable Essence and avoiding abilities such as Temporal Anomaly, Disintegrate, and Deep Breath.
- Unstable Essence: Manage Unstable Essence similarly to the previous boss phase, but with less emphasis on focusing adds since there are no Violent Eruption casts in this phase. Be aware that adds will still deal raid-wide damage if their cast finishes.
- Temporal Anomaly: Players must intercept the Temporal Anomaly balls of light to prevent the boss from gaining an absorb shield. Low-health players should avoid intercepting the balls to maintain their survivability.
- Disintegrate: Targeted players should move to the side and avoid touching others, especially during Deep Breath, as they will be slowed by 30%, making dodging more difficult.
- Deep Breath: The boss will perform two flyovers, dealing lethal damage to players. Players must avoid the flyovers by observing the boss’s direction and reacting accordingly.
Assault of the Zaqali
Assault of the Zaqali is a demanding encounter that requires excellent teamwork and coordination. With multiple mechanics to manage, players must be prepared to adapt and communicate effectively throughout the fight. This boss guide will outline the key mechanics, recommended strategies, and helpful tips to lead your team to victory.
Recommended Setup: 2 Tanks / 4 – 5 Healers / 13+ DPS
Boss Abilities
- Boss
- Barrier Backfire: If Zaqali adds reach the door and hits it, the mechanic damages all players and applies a DoT that ticks for 37,000 shadow flame damage.
- Arbalest Fire: Circles on the ground deal 31,000 physical damage to all players within 12 yards of the impact. Players must dodge these circles to avoid damage.
- Warlord Kagni: This boss will switch platforms when fully charged, leaping toward the center of the new platform. Players must avoid the landing area and the lines of fire that shoot outwards.
- Devastating Leap: Inflicts 93,000 volcanic damage within 12 yards and knocks away players caught in the impact.
- Heavy Cudgel: Deals 312,000 physical damage to the tank in a frontal cone and increases damage absorbed by 15% for 45 seconds. Each hit also spawns Cave Rubble (stones) that must be thrown off the edge using the extra action button.
- Magma Mystic: To prevent taking extra damage, players must destroy the Molten Barrier absorption shield as quickly as possible.
- Molten Barrier: Deals 46,000 fire damage and gets a stack of Molten Empowerment, which increases fire damage by 25% every 4 seconds until the shield is destroyed.
- Magma Flow: A dispellable DoT that does 78,000 lava damage on hit and 15,000 lava damage every 3 seconds for 15 seconds.
- Lava Bolt: Interruptible Lava Bolt cast that deals 37,000 volcanic damage. This ability is only available when the Molten Barrier has been breached.
- Flamebound Huntsman: Throws Blazing Spears at random players, dealing damage to players within 8 yards.
- Blazing Spear: Inflicts 149,000 physical damage to all players within 8 yards. After the initial strike, the circle will stay and deliver an extra 124,000 fire damage to players within 8 yards.
- Obsidian Guard: Avoid the Scorching Roar and Volcanic Shield abilities.
- Scorching Roar: Inflicts 24,000 fire damage every 0.5 seconds for 1.5 seconds to players within 25 yards.
- Volcanic Shield: The guard will fire a magma beam at a random player, dealing 200,000 Volcanic damage to everyone in the beam’s path.
- Zaqali Wallclimber: Prevent these adds from reaching the door and triggering Barrier Backfire.
Phase Two Boss Abilities
- Catastrophic Slam: A massive circle will spawn at the door, delivering 545,000 physical damage distributed evenly among the players standing in it. When you soak this ability (Weakened Vitality), the damage it deals with increases by 75%.
- Desperate Immolation: At the beginning of Phase Two, the boss will use this ability, healing for 7.4 million health. When the channel is completed, the boss will gain Ignara’s Fury.
- Ignara’s Fury: After the boss channels Desperate Immolation, the raid will absorb 156,000 fire damage every 10 seconds until the fight ends.
Strategy
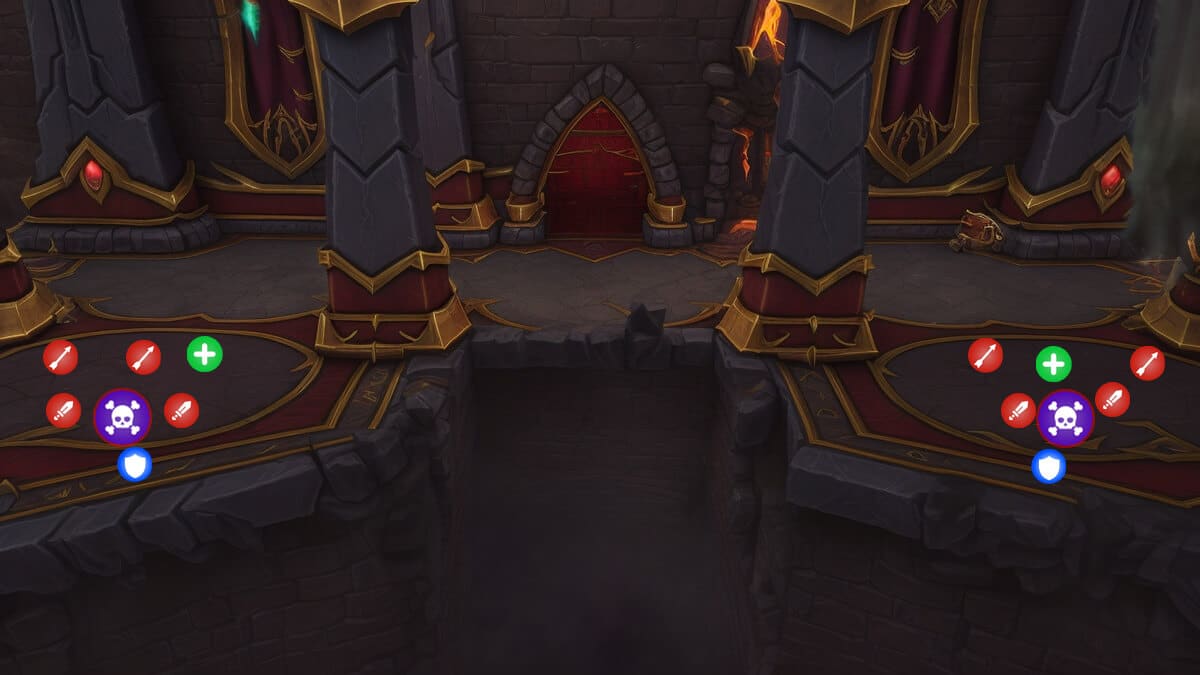
Phase One
- Preparation: Split your raid into two equal groups, with each group containing the following:
- 1 Tank
- 2+ Healers
- 6+ DPS
- Initial Boss Engagement: Pull the boss where it stands and use Hero/Lust on the pull. Focus on dealing damage to the boss, ignoring the rocks that spawn initially. The boss will fly away after around 27 seconds, telling each group to proceed to their designated platform.
- Dealing with Adds: Both parties will encounter a Mystic add and numerous lesser ones. They should be grouped on top of the Mystic and eliminated. The party with the boss will also have to deal with the rocks, with random players picking them up and chucking them down the edge at the yellow arrows indicated.
- Managing Add Aggro: Tanks should make it a point to pick up each adds as quickly as feasible. Healers should avoid standing near the edges of the platforms, while DPS players should focus on the following target priority:
- Magma Mystic (until shield broken)
- Obsidian Guard
- Flamebound Huntsman
- Boss
- Wall Climbers
- Transitioning Between Platforms: When the boss achieves 100 energy, it will leap to another platform. Players should walk away from the center of the room and prepare to avoid the lines that radiate from there.
Phase Two Strategy
- Transitioning to Phase Two: When the boss’s health reaches 25%, it will move to the center of the room and channel Desperate Immolation, healing itself and granting the Ignara’s Fury buff. The boss will deliver fire damage to all players every 10 seconds until the fight ends.
- Managing Adds: Bring any leftover adds to the boss and have them cleaved down.
- Dealing with Flaming Cudgel: The boss will use Flaming Cudgel on the tank, spawning fire swirls instead of rocks. Ensure the boss is faced away from the raid and avoid the fire swirls.
- Handling Catastrophic Slam: When the boss reaches 100 energy, it will send a shockwave toward the door. At least ten players should absorb the shockwave to avoid triggering Barrier Backfire, but be aware of the Weakened Vitality debuff, which increases damage taken by Catastrophic Slam.
- Final Push: Concentrate on inflicting maximum damage to the boss before raid-wide damage becomes too great to repair.
Buy Aberrus Normal Boost
Attain 415+ iLvl gear with a proficient team.
Rashok, the Elder
Prepare to confront Rashok, a difficult single-target encounter with a one-phase repeating cycle and an interval. Success in this fight hinges on strategic lava pool positioning, dodging lava puddles, and soaking the powerful Charged Smash attack. As the fight progresses, lava puddles and pools will significantly increase, testing your team’s planning and execution skills.
Recommended Setup: 2 Tanks / 5+ Healers / 13+ DPS
Boss Abilities
- Ancient Fury: Enrage mechanic that triggers at 100 energy, dealing 312,000 damage to the entire raid every 3 seconds.
- Molten Blood: Lava puddles shoot out from Lava Wave pools every 15 seconds; dodge them to avoid 234,000 Fire damage every 1.5 seconds.
- Searing Slam: The boss marks a player, jumps to their location, and damages all players. The damage rises as the number of Lava Pools in the room grows. Avoid triggering Lava Explosion by hitting another Lava Pool.
- Doom Flame: Soak circles around the room to prevent 140,000 damage to the entire raid.
- Shadowlava Blast: Massive frontal attack that can be baited or avoided.
- Charged Smash: Soak the attack with multiple players to minimize damage.
- Volcanic Combo: Standard tank combo mechanic; avoid getting hit by the same attack type (Fire or Earth) twice.
- Siphon Energy: Move the boss to the center to trigger Elder’s Conduit (Energy Drain); the Boss will start losing his energy and doing AOE damage to the whole raid. Players should group up to assist healers and avoid the line of shadows.
- Smoldering Rage: When Elder’s Conduit is finished, the boss knocks everyone back and deals minor damage; players receive a debuff preventing energy drain for a certain period.
Strategy
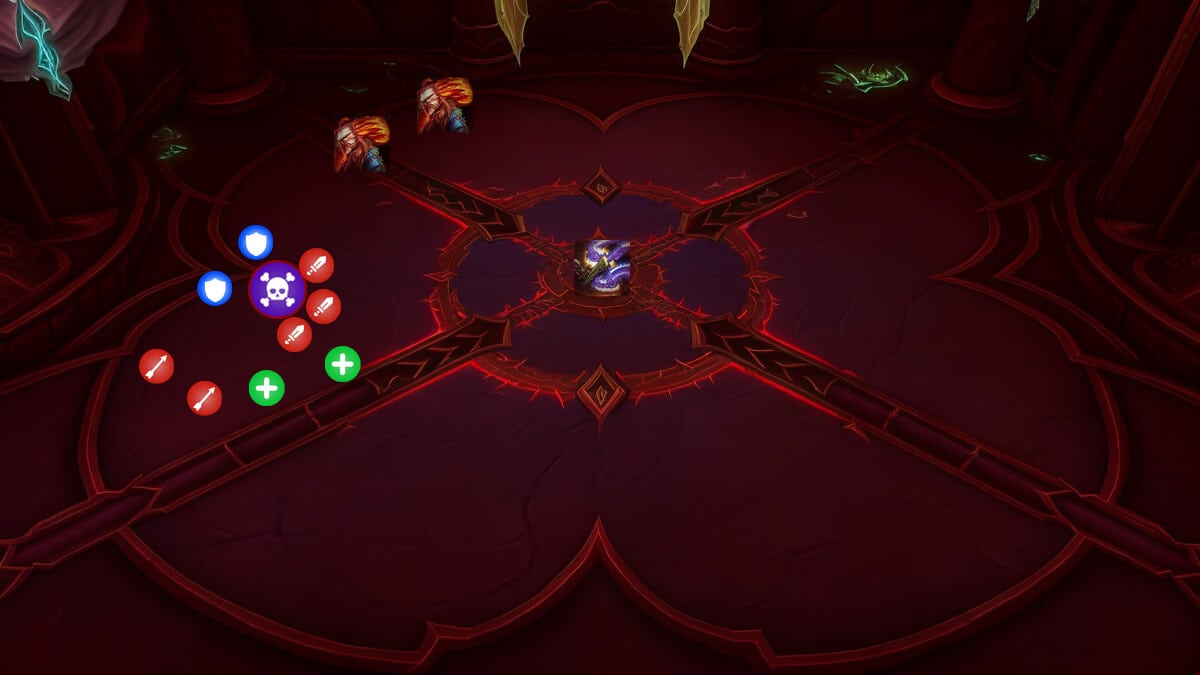
- Opening Position: Position the boss to the side of the chamber, facing the wall. Players targeted by Searing Slam should position it away from the raid, with each subsequent Searing Slam placed next to the previous one in a counter-clockwise direction.
- Dodging and Soaking: Players should position themselves to maintain line-of-sight with the boss and Lava Wave pools. Soak Doom Flames circles and Charged Smash with multiple players. Bait or dodge the Shadowlava Blast frontal attack.
- Intermission: Bring the boss to the middle of the room, landing the last Searing Slam while avoiding lava pools. Move the monster to the middle of the room when he has 100 energy to activate Elder’s Conduit. During the intermission, stack up as a group while dodging Shadow Lines.
- Repeat the Cycle: Continue the fight as before, but now dodge more lava puddles and handle increased damage from Searing Slam.
Vigilant Steward, Zskarn
Zskarn, the Vigilant Steward, is a dynamic, one-phase shadowed crucible tier raid boss that requires players to move quickly, add-cleave, and multi-dot. To complete this encounter, players must successfully crowd-control many golem creations, fight them, and utilize the items they drop to remove traps strewn throughout the chamber. The boss will regularly launch a powerful knockback assault, putting players’ placement abilities and ability to dodge lethal traps to the test. Be wary of the exquisite dragon statues on the other side of the chamber, as they will launch a strong fire strike that will envelop about half of the space, placing players in grave danger.
Recommended Setup: 2 Tanks / 4-5 Healers / 13+ DPS
Boss Abilities
- Dragonfire Traps: Zskarn will detonate a couple of Dragonfire Traps near him and one at random in the arena. Touching one of the traps causes a DoT that does 46,000 fire damage every 1 second for 6 seconds. This DoT stacks.
- Animate Golems: Several Golems (we believe three) will appear and attempt to activate random dormant traps by casting Activate Dragonfire Trap. This ability may be interrupted and should be your priority. Once you’ve killed the Golem, you may interact with it and take Salvage Parts, which you can then use to disable an active trap by clicking the additional action button when you’re close to it. Golems can be slowed, stunned, and gripped.
- Tactical Destruction: When the boss gets 100 Energy, numerous Dragon statues near him will be activated. The Statues summon a pizza slice-shaped (but improperly cut) ability that does 780,000 fire damage to all affected players. Because the frontal covers over half of the room, ensure you are secure as soon as possible.
- Shrapnel Bomb: The boss produces three bombs that the tank or an immune player must absorb. If the explosives are not drenched, they will detonate after 30 seconds, doing 280,000 physical damage to all players and triggering a DoT that does 46,000 physical damage every 1 second for 10 seconds. Triggering a Bomb instead does 624,000 physical damage to the player absorbing them and applies an 8-second DoT that deals 46,000 physical damage every 1 second. All of the explosives should be able to be handled by the off-tank. However, immunities remain strong and should be exploited whenever feasible.
- Unstable Embers: The boss targets several players (shown with a red arrow); All players within 5 yards are hit by a 53,000 fire damage pulse from those players. Just spread, and don’t hit other players with it.
- Blast Wave: A knock-back ability that does 124,000 fire damage to everyone and applies a DoT that ticks for 18,000 fire damage every 0.5 seconds for a total of 6 seconds. While it may appear to be a simple ability, it is the most dangerous in the fight since the knock-back may knock you into active Traps or people targeted by Unstable Embers. When the boss uses this skill, be mindful of your posture.
- Searing Claws: Apply a DoT to the current tank for 20 seconds, causing 24,000 Fire Damage every 2 seconds. Because you will utilize powerful Tank defensives to soak the bombs, this is a relatively poor ability. Swap who is tanking whenever damage becomes too high.
Strategy
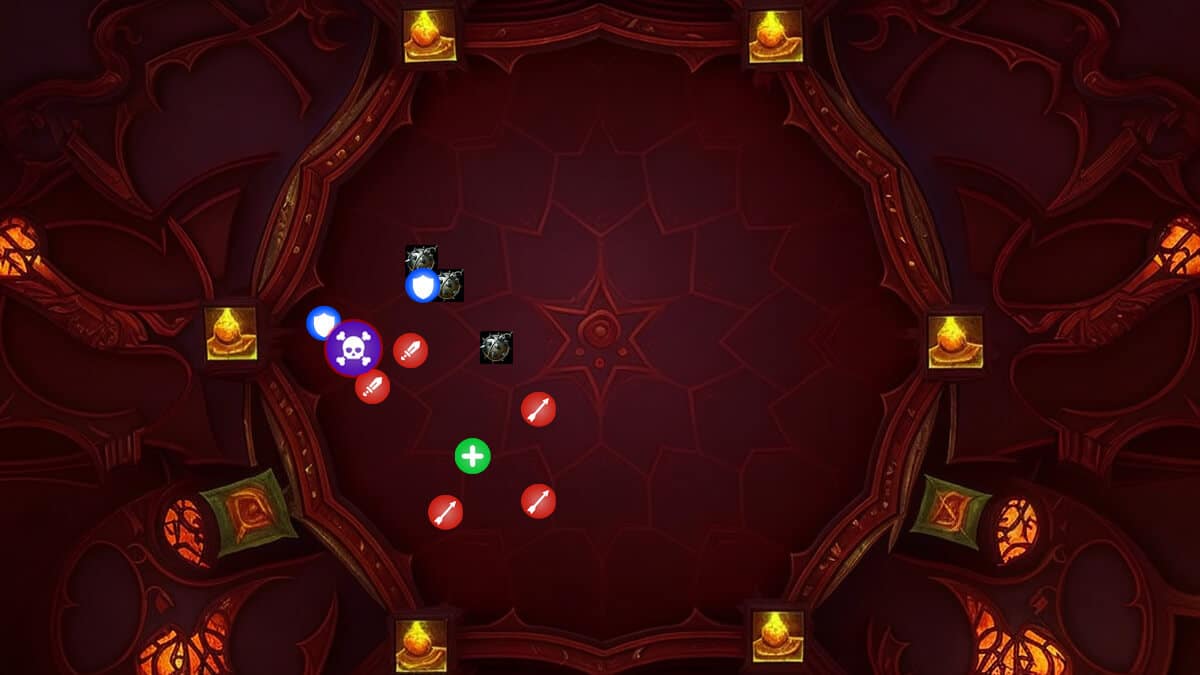
Begin by placing the boss at one of the Dragon Statues along the room’s edge and remaining there until the first traps trigger. Afterward, go in a circular path, keeping the boss near active traps. Because trap activation is random, the location will be extremely unexpected.
The off-tank should focus on absorbing Shrapnel Bombs as soon as they emerge. If necessary, request external healer help or player immunities, especially if the chamber is filled with active traps later in the fight. Because certain explosives may be difficult to reach without incurring numerous stacks from going past traps, this is a good moment to seek immunity for soaking. Because the damage is physical, skills such as Rogue’s Cloak of Shadows will be ineffective.
Players targeted by Unstable Embers should keep a safe distance from others while remaining loosely dispersed because this ability happens frequently.
When Golems emerge, use grips, knocks, or moving the boss on top of them to bring them closer to the monster for more cleave damage. Priority should be given to destroying Golems while they are active, stopping their spells, and eliminating them as quickly as possible. Following the destruction of a Golem, chosen mobile players must gather the tools and disarm the trap. Prioritize traps around the middle of the room, as the knockback will usually send players there. Golems do not require tanking because their primary goal is to reach traps.
Position yourself carefully during the Blast Wave to prevent being pushed into traps or clashing with Unstable Embers targets. Healers can expect greater raid damage and DoT; players pushed into active traps should pay special care due to simultaneous DoT effects.
Players cannot be thrown off the platform; therefore, this is not an issue.
When the boss reaches 100 Energy, numerous adjacent Dragon Statues will be activated. To prevent being murdered instantaneously, quickly walk to a safe area (on the opposite side of the room).
The number of Dragon Statues that may be triggered simultaneously and their range appears to rise as the conflict progresses.
This encounter has no stages, but it becomes tougher when more traps surface than can be eliminated, limiting space for evading knockbacks and Dragon Statue frontal strikes.
Completing the encounter necessitates using all three tools to destroy traps and prevent Golems from completing their Activate Dragonfire Trap spells. Because there are no extra trap-control methods, these strategies should suffice.
Magmorax
Magmorax is a single-target shadowed crucible boss with high DPS and HPS requirements. Players must be watchful and quickly absorb lava pools to reduce their size, or they risk running out of arena space. The Boss also deals a massive knockback to the whole raid, forcing players to choose strategic positions. Prepare for a battle with a ferocious hydra as Magmorax puts the heat up on your raid squad.
Recommended Setup: 2 Tanks / 5 – 6 Healers / 13+ DPS
Boss Abilities
- Catastrophic Eruption: When Magmorax’s energy hits 100, he does 150% more physical damage to all players, inflicts 93,000 fire damage to all players, and increases fire damage suffered by 50% every 2 seconds until the raid is wiped out or the monster is slain.
- Molten Spittle: For 6 seconds, a circle of 2-3 players (depending on raid size) does 62,000 fire damage every 1.5 seconds. It then explodes, inflicting 93,000 fire damage on anybody within a 10-yard radius and leaving a Magma Puddle on the ground.
- Magma Puddle: Magma Puddles expand in size until players wet them. Standing in a Magma Puddle provides 20 seconds of Searing Heat, which does 6,000 fire damage each second. At ten stacks, players become overheated, making them unable to reduce Magma Puddles for 20 seconds.
- Blazing Tantrum: The boss gets 5 energy and does 31,000 fire damage per second when standing in a Magma Puddle.
- Igniting Roar: Magmorax inflicts 109,000 fire damage on all players and imposes a DoT that causes 4,000 fire damage every tick. During this spell, there are extra Magma Puddles on the ground.
- Overpowering Stomp: Magmorax knocks all players away and causes 124,000 physical damage to them.
- Blazing Breath: Magmorax uses a frontal cone to strike a random player, causing 249,631 fire damage to all players impacted by the assault.
- Incinerating Maws: Tanks must switch after earning two stacks in this simple tank-swap concept.
Strategy
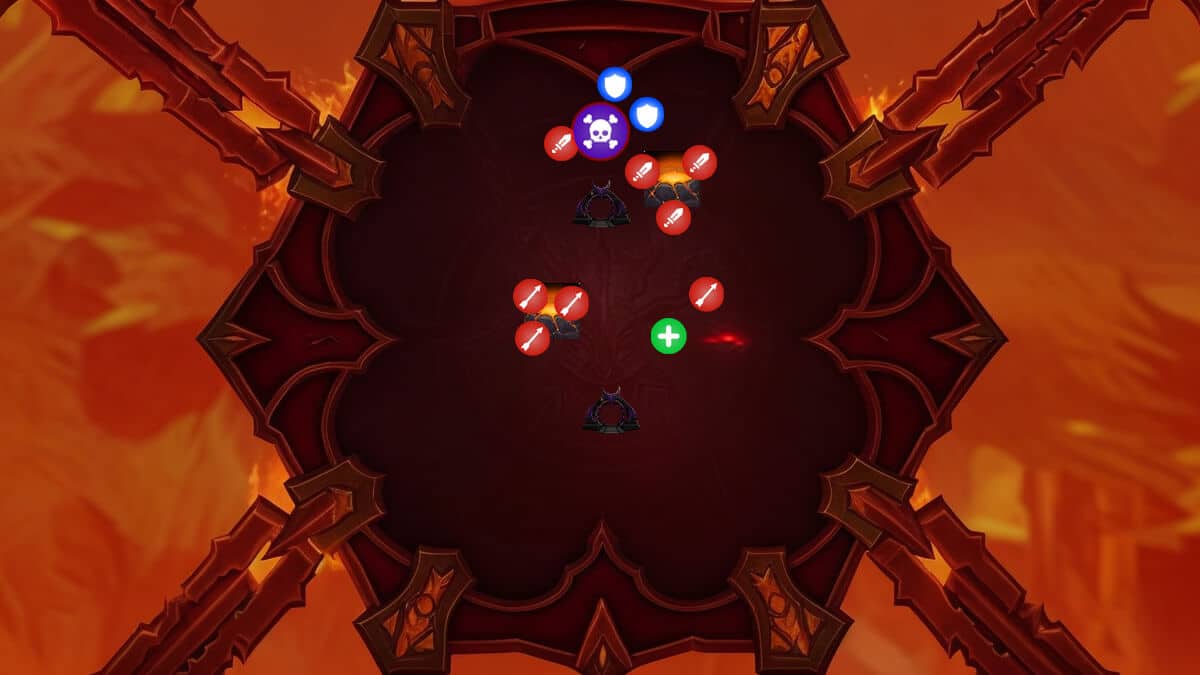
Melee players should set their puddles near the boss in the early phases of the fight so that the whole melee group may soak them. Ranged players should keep their puddles nearby as well.
Always soak a single puddle minimum with three players. Due to decreasing returns, one person cannot fully soak a puddle, and two players can, but with large stacks, utilizing three players enables full soaking without putting too many stacks on the people. However, watch your HP as your initial hit combined with soak may kill you.
Drop the puddle to the side if you get a Magma Puddle circle while away from the raid, such as from a knock-back. In general, concentrate on cleaning the space surrounding the boss and the middle of the chamber. When the boss’s health falls below 30%, throw puddles to the side and soak only those near the boss’s puddles.
To avoid deadly damage combos, avoid amassing high stacks from Magma Puddles before casting Igniting Roar.
Position yourself inside the range of the Warlock Gateway when the boss performs Overpowering Stomp (kick-back). Using the Gateway 0.5 seconds before the cast finishes negates the knock-back. Early in the fight, getting knocked is acceptable (avoid lava); however, when the boss reaches 80+ energy, avoid knock-backs as they may cause deaths due to room coverage and Igniting Roar stacks.
When the boss’s health dips below 30%, it’s critical to position puddles to the side and only soak those in the boss’s path. The entire raid should stack behind the boss for additional healing. Passive raid damage is already high at this stage, so stacking provides significant support.
The fight emphasizes avoiding running out of space and keeping the monster from standing in Magma Puddles. All players must contribute to puddle soaking; otherwise, some players will soak more and accumulate higher stacks than necessary.
Echo of Neltharion
Echo of Neltharion is a unique single-target shadowed crucible tier raid boss that transitions into a cleave-heavy fight in its later stages. Players must navigate around stone walls and defeat mind-controlled allies to progress through the fight. The final level requires the raid to use a protective portal to survive Neltharion’s huge explosion while fighting out the spawning Voidlings.
Recommended Setup: 2 Tanks / 4 – 5 Healers / 13+ DPS
Boss Abilities and Strategy
Phase 1
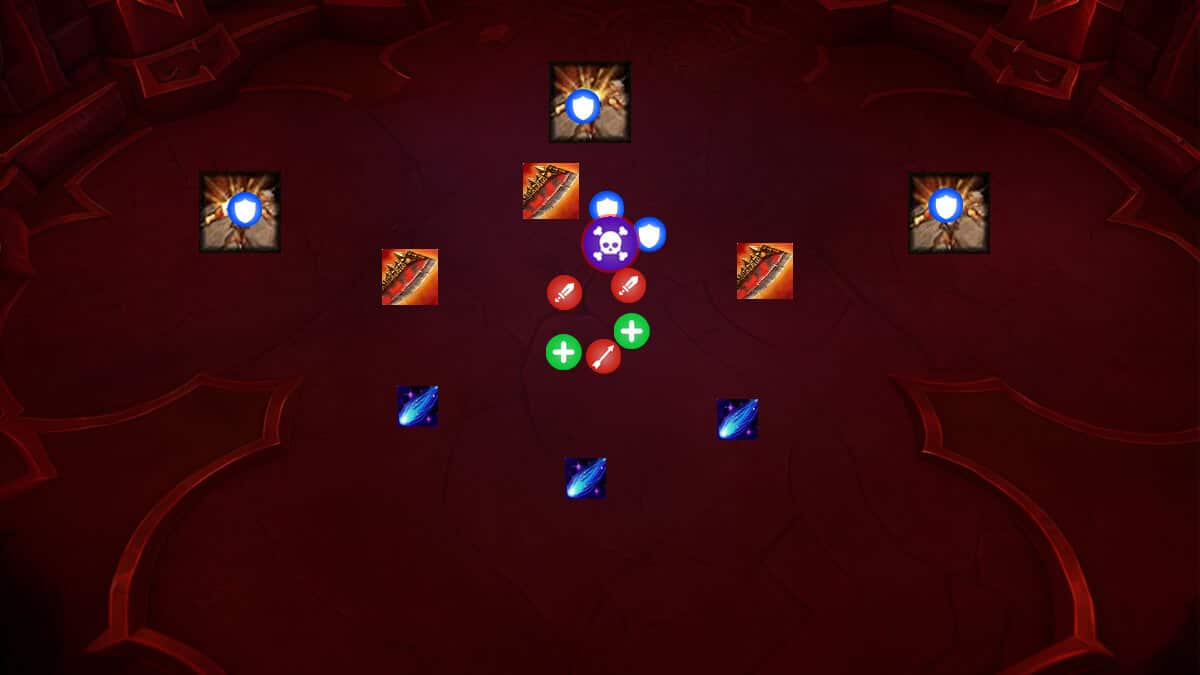
- Twisted Earth: Stone walls divide the room, breaking the line of sight. Pass through using teleport abilities or breaking the walls with Rushing Darkness or Calamitous Strike (tank ability).
- Volcanic Heart: Several players are hit by a red arrow and circle, which does Volcanic damage to anybody within 15 yards and applies a DoT. Players should run through gaps created by Rushing Darkness.
- Echoing Fissure: Boss spawns a large circle beneath him, killing players inside and dealing Volcanic damage to all players. Each subsequent Echoing Fissure increases the damage taken.
- Rushing Darkness: Marked players receive a beam, inflicting Shadow damage and knocking them back. Hitting a wall opens a gap and causes a mild DoT to be applied to the whole raid.
- Calamitous Strike: The tank swap mechanism knocks the tank back and smashes the wall behind it.
Intermission Phase
- Raze the Earth: Boss destroys all walls, creating large swirls and covering the room with Collapsed Earth. Dodge all swirls.
- Surrender to Corruption: Channel inflicts Shadow damage. The raid absorbs Shadow damage when it expires, and Phase 2 begins.
Phase 2
- Voice from Beyond: Three adds spawn and channel into the boss, preventing him from dropping below 40% health. Corrupted players must break the absorb shield on the add before the entire raid can attack.
- Volcanic Heart: Functions as in Phase 1.
- Twisted Earth: Functions as in Phase 1.
- Corruption: Players get hostile, forcing them to destroy the absorption protection on the Voice from Beyond add.
- Umbral Annihilation: Inflicts increasing Shadow damage to all players. Kill Voice from Beyond adds quickly.
- Crumbling Facade: Random swirls spawn, inflicting Volcanic damage. Dodge.
- Rushing Darkness: Functions as in Phase 1.
- Sunder Shadow: Hits the tank, turning them into shadows that can move through walls. Line up to break walls.
Phase 3
- Sunder Reality: Boss turns nearby walls into portals that spawn adds. Adds fixate on random players and gains increased damage done. Portals deal damage to nearby players but protect them from Ebon Destruction.
- Ebon Destruction: Sundered Reality portals do not do lethal harm to players. Destroys nearby portals being used by players.
- Rushing Darkness: Functions as in previous phases, but avoid hitting walls to preserve portals.
- Calamitous Strike: Functions as in Phase 1 but does not destroy walls to preserve portals.
Scalecommander Sarkareth
Scalecommander Sarkareth is a powerful draconic boss drawing upon the power of the Void to enhance his abilities. Players must use teamwork and coordination to counter his various abilities and overcome his three stages: The Legacy of the Dracthyr, A Touch of the Forbidden, and The Seas of Infinity. There was no PTR testing of Scalecommander Sarkareth; however, we have made this guide from rumors and dungeon journal info. This guide will be optimized with Dragonflight 10.1 Patch release.
Boss Abilities
Stage One: The Legacy of the Dracthyr
- Oppressing Howl – Affects all players, increasing incoming effects of Mass Disintegrate, Searing Breath, and Glittering Surge. Removed when struck by any of these abilities.
- Echoing Howl – Activated when Oppressing Howl is removed, causing 28,700 Shadow damage to all players.
- Glittering Surge – Inflicts 85,000 Arcane damage to all players every 1 sec for 8 sec.
- Scorching Bomb – Placed near players, inflicting 126,000 Fire damage within 10 yards every 1 sec. Explodes with Scorching Detonation after 12 sec.
- Burning Ground – AOE created when Scorching Bomb erupts, causing 98,000 Fire damage every 1 sec to players within.
Stage Two: A Touch of the Forbidden
- Void Bomb – Placed near players, inflicting 98,000 Shadow damage within 12 yards every 1 sec. Explodes with Void Surge after 20 sec.
- Abyssal Breath – Inflicts 237,000 Shadow damage in a line and knocks players back.
- Null Glimmer – Images of Sarkareth left behind after casting Abyssal Breath.
Stage Three: The Seas of Infinity
- Void Bomb – Similar to Stage Two.
- Cosmic Ascension – Sarkareth flies up and crashes through the floor, causing 511,000 Shadow damage and knocking back players within 30 yards.
- Astral Formation – Inflicts 106,000 Shadow damage to nearby players every 1 sec.
Buy Sarkareth Heroic Boost
Claim new 437+ item level loot with expert players.
Strategy
Phase 1 Strategy
- Tanks: Rotate and manage stacks of Burning Claws to reduce raid damage from Blazing Blast.
- Healers: Focus on players affected by Dazzled and dispel Disintegrated when possible.
- DPS: Prioritize Scorching Bombs and avoid standing on Burning Ground.
Phase 2 Strategy
- Tanks: Manage stacks of Void Claws and position to minimize raid damage from Void Blast.
- Healers: Dispel Infinite Duress when possible and prepare for Dread.
- DPS: Focus on Null Glimmer images and avoid triggering Rescind.
Phase 3 Strategy
- Tanks: Manage stacks of Void Slash and position to minimize raid damage from Void Blast.
- Healers: Dispel Infinite Duress when possible, and be ready for Dread and Motes of Oblivion.
- DPS: Prioritize Astral Formations and avoid triggering Astral Eruption.
By following these strategies and understanding the abilities of Scalecommander Sarkareth, we think your raid will be well-prepared to take on this formidable boss. Good luck!

Raid Loot Drops and Rewards in Aberrus, the Shadowed Crucible
Aberrus, the Shadowed Crucible offers a variety of loot drops and rewards, including item levels for normal drops, unique drops, and class trinkets. The following tables outline the loot drops and their sources:
Normal Drops Item Levels
| Raid Boss # | LFR | Normal | Heroic | Mythic |
|---|---|---|---|---|
| 1 – 3 | 402 | 415 | 428 | 441 |
| 4 – 5 | 405 | 418 | 431 | 444 |
| 6 – 7 | 408 | 421 | 434 | 447 |
| 8 – 9 | 411 | 424 | 437 | 450 |
Unique Drops
| Item Name | Source |
|---|---|
| Screaming Black Dragonscale | Kazzara |
| Djaruun, Pillar of the Elder Flame | Rashok |
| Neltharion’s Call to Chaos (DH, Evoker, Mage, Paladin, Warrior) | Echo of Neltharion |
| Neltharion’s Call to Suffering (DK, Druid, Priest, Rogue) | Echo of Neltharion |
| Neltharion’s Call to Dominance (Hunter, Monk, Shaman, Warlock) | Echo of Neltharion |
| Voice of the Silent Star | Scalecommander Sarkareth |
These tables provide an overview of the loot drops and rewards players can expect from the Aberrus, the Shadowed Crucible raid in Dragonflight. Remember that the rewards may vary depending on individual player luck and raid difficulty.
To learn more about WoW 10.1 gearing, refer to our in-depth WoW 10.1 Gearing Guide & WoW Dragonflight Mythic+ Guide.
Tier Drops from Aberrus Bosses
Here’s a table showcasing which bosses in Aberrus, the Shadowed Crucible drop tier set pieces:
| Boss | Tier Set Piece |
|---|---|
| Magmorax | Helm |
| Echo of Neltharion | Shoulder |
| Zskarn, the Vigilant Steward | Chest |
| The Forgotten Experiments | Hands |
| Rashok, the Elder | Legs |
| Scalecommander Sarkareth | Omni Tier Token |
The Omni Tier Token dropped by Scalecommander Sarkareth can be converted into any tier piece for that class, providing players additional flexibility when completing their tier sets.
For a deeper understanding, visit our elaborate Aberrus Tier Set Bonuses Guide.
